Ordering Engine Button Glossary
Every key button in the RAZE Ordering Engine, screen by screen, with what happens when you click it.
Runs on: Desktop and tablet. A web app you open in a browser; it is not built for phones.
Quick Reference
Each screen below is numbered. The number on the picture is the number in the list.
The search bar, + Add Project and Ask AI sit in the top bar on every page.
Accept and Reject appear in the Action column once the inspector submits.
Nothing is created until you click Create or confirm.
Before You Start
You can log in to the Ordering Engine at order.getaraze.com.
For the full steps, open the guide the button belongs to. Each item names it.
Step 1 — The Login, the Top Bar and the Sidebar
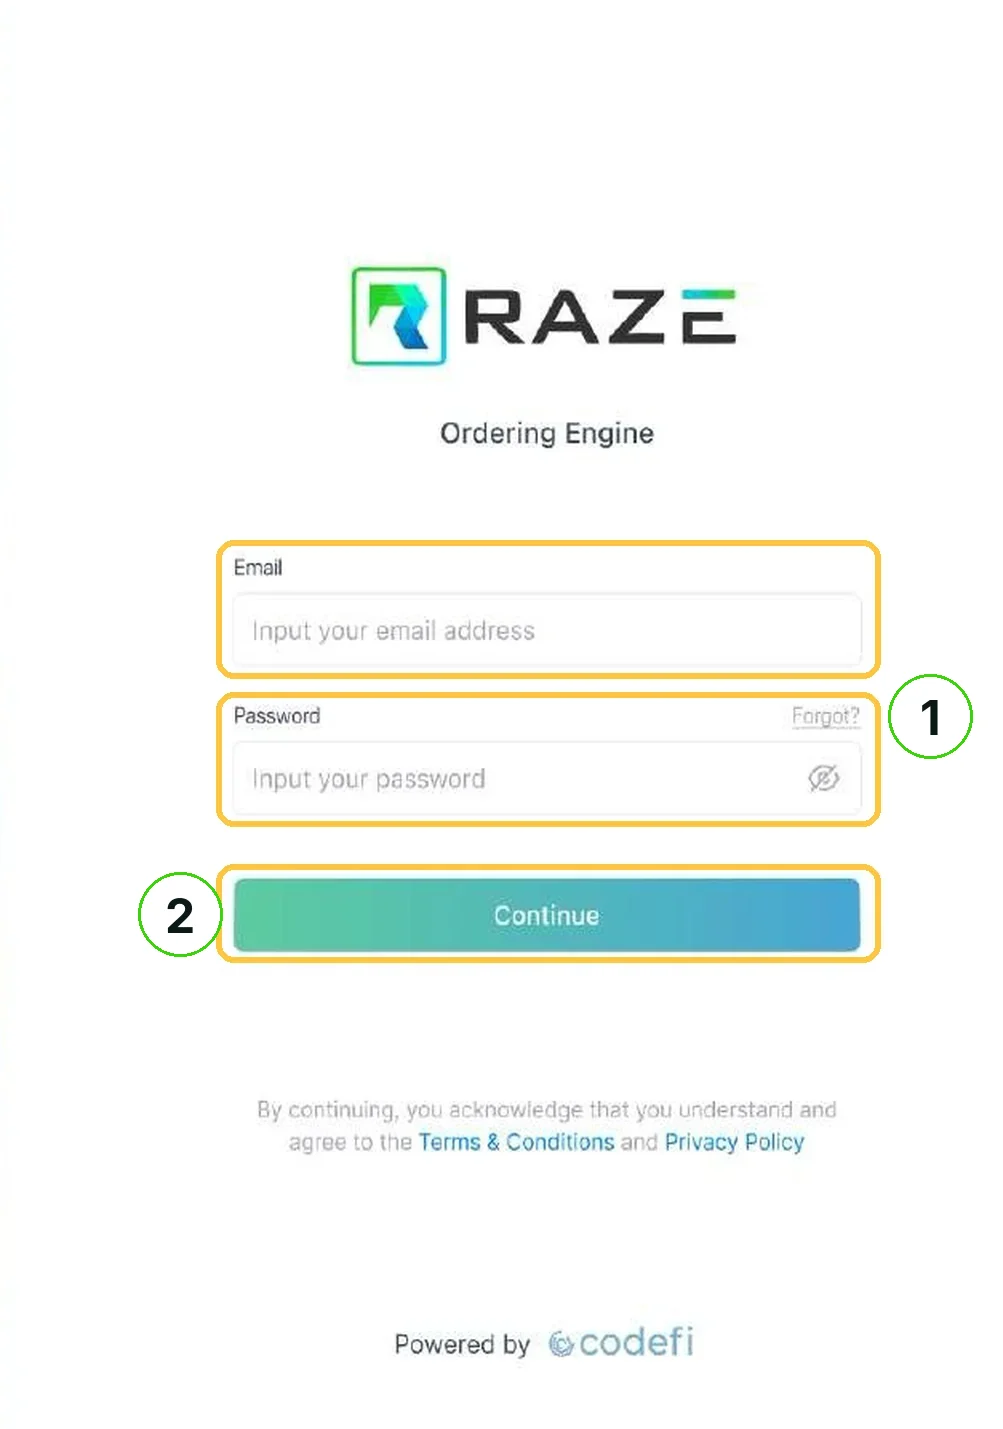
1. Forgot?
Next to Password on the login screen. Click it and a reset link goes to your email. See Getting Started with the Ordering Engine.
2. Continue
Logs you in with the email your administrator set up and your password. Every action is tracked to you, so never share your password.
3. Search bar
At the top of every page. Type part of a project name and the project list filters as you type.
4. + Add Project
Starts a new project in four steps, from Basics to Review & Confirm. See Creating a Project.
5. Ask AI
At the top of every screen. Type a request, such as ordering a draw inspection, and review the preview before you confirm. See Using Ask AI.
6. Project
Opens Projects, the first of the three sidebar modules with People and Analytics. See Getting Started with the Ordering Engine.
7. People
Opens People: your borrowers, general contractors and inspectors. See Managing People and Contacts.
8. Analytics
Opens the preset reports and the ask box. See Running Reports in Analytics.

9. Display
Chooses the project list's columns, such as lender, loan amount, address, borrower and general contractor.
10. Project name
Click a project's name to open its workspace on the Jobs tab.

Step 2 — The Add Project Wizard
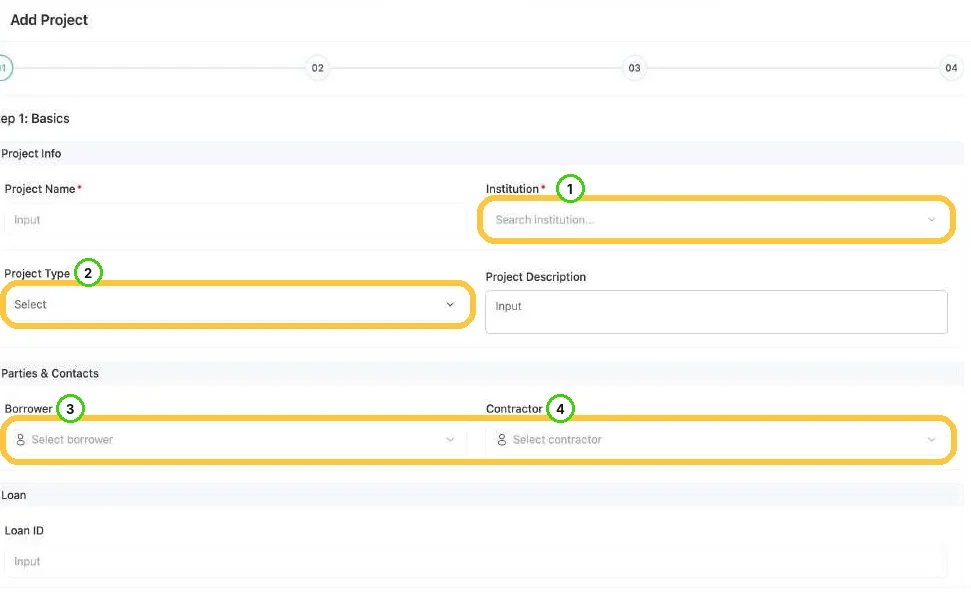
1. Institution
Sets the templates, the workflow and how inspectors are matched to the project. See Creating a Project.
Get the Institution right the first time. It is hard to change once inspections exist.
2. Project Type
Controls how inspections are routed.
3. Borrower
Pick the borrower from People. They are notified automatically as the project moves forward.
4. Contractor
Pick the contractor from People the same way. Add a missing borrower or contractor in People first.
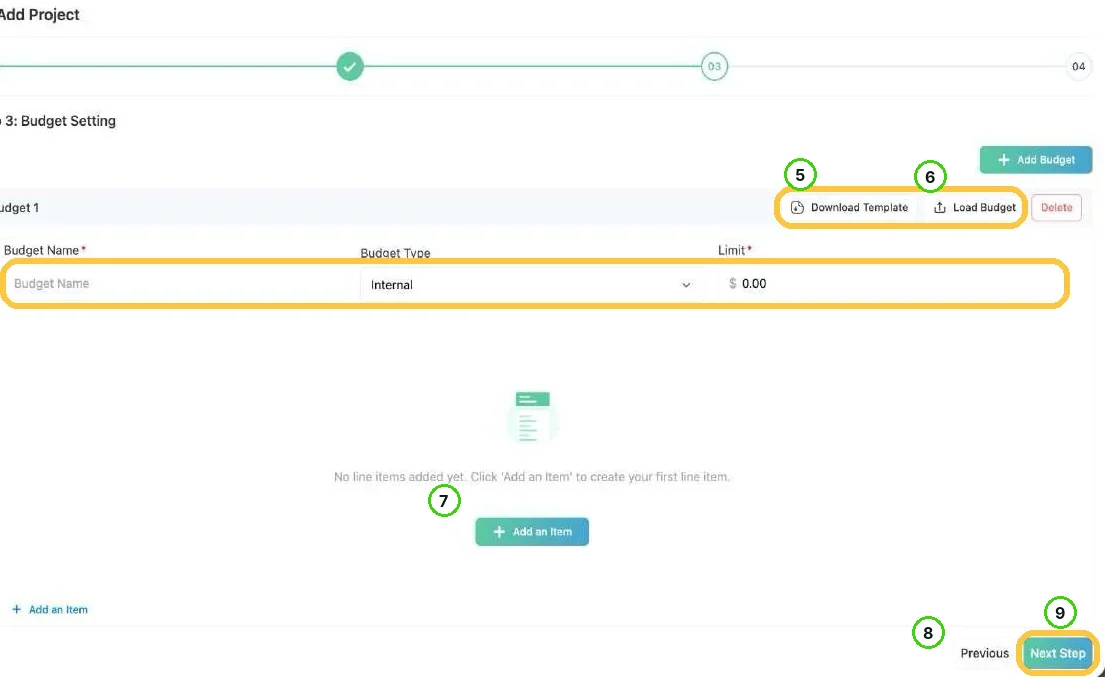
5. Download Template
Downloads the budget template. Fill in one row per line item: Name, Percent, Amount and Comment. See Setting Up the Budget.
6. Load Budget
Imports every line from the filled-in template at once.
7. Add an Item
Adds one line at a time: name, percent of the total and an optional amount.
The lines must total exactly 100%. Saving is blocked until they do.
8. Previous
Goes back a step so you can fix it. Nothing is created until you confirm on Review & Confirm.
9. Next Step
Moves on to Review & Confirm, which shows the full summary before the project is created.
Step 3 — The Project Tabs
1. Jobs
Order and track every inspection. A project opens on this tab. See Using the Project Tabs.
2. Overview
The parties, the address and the property details. Click Edit on Parties & Contacts to change a borrower or contractor.
3. Budget
The lines inspectors draw against. See Setting Up the Budget.
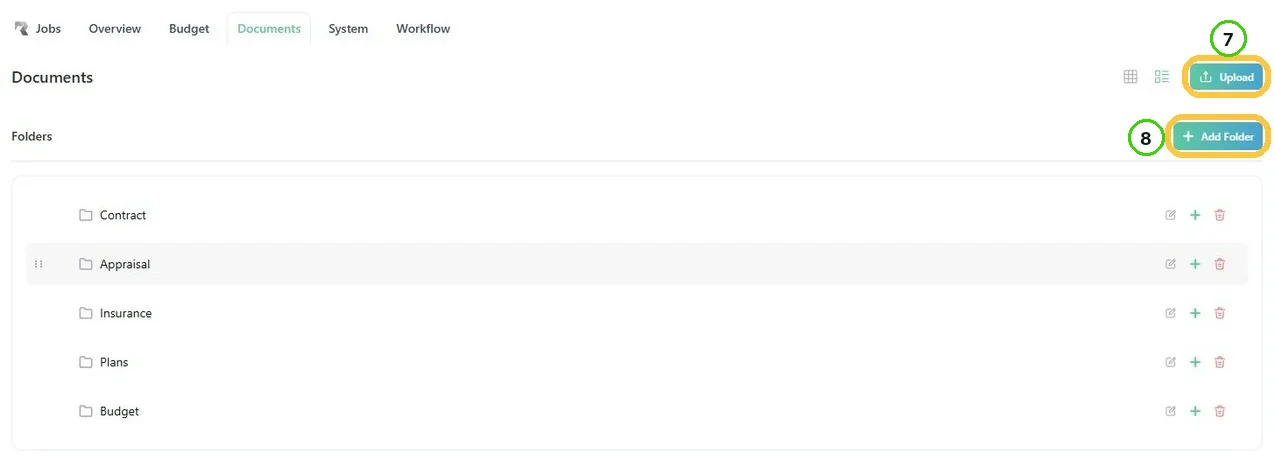
4. Documents
Contracts, plans, appraisals and insurance.
5. System
The Project GUID and the created and changed dates. Paste the GUID into any support request.
6. Workflow
Recurring orders and status alerts. See Automating Recurring Draws and Alerts.

7. Upload
Uploads a file into a folder: Insurance, Budget, Contract, Plans or Appraisal. You can also drag the file onto a folder. Files can be PDF, DOC, DOCX, XLS or XLSX, up to 10 MB each.
8. + Add Folder
Builds your own folders and subfolders.
Step 4 — The Budget Tab and People
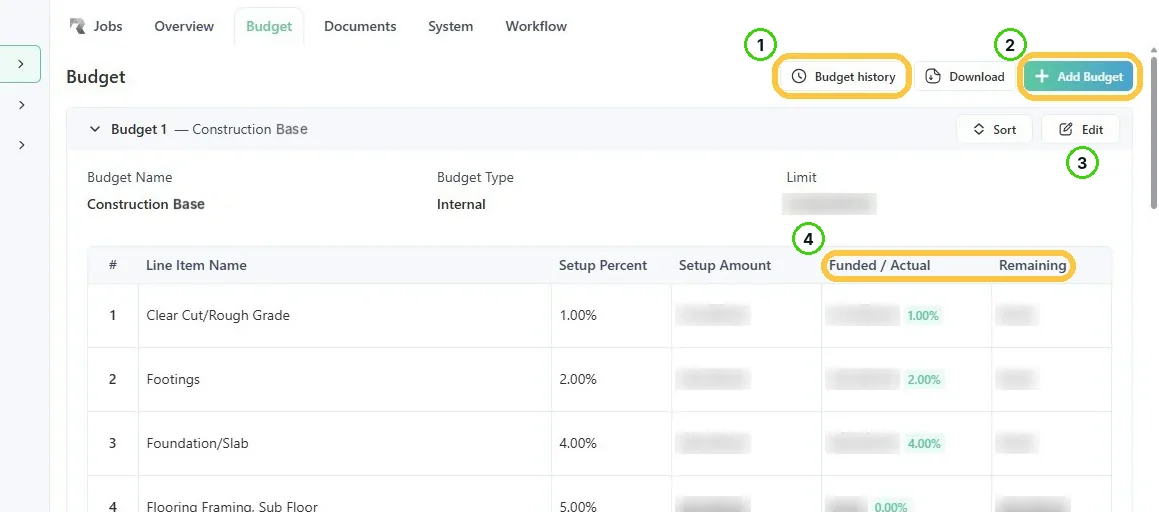
1. Budget history
Shows every change made to the budget. See Setting Up the Budget.
2. + Add Budget
Adds a separate budget, such as Contingency.
3. Edit
Changes a line's name, percent or amount. The lines must still total exactly 100%.
4. Funded / Actual and Remaining
Funded / Actual shows what has been drawn on each line, and Remaining shows what is left. They're columns, not buttons.
5. Account Type
Filters People by Borrower, General Contractor or Inspector. See Managing People and Contacts.
6. A person's row
Click the row to open the record.

7. Edit on Profile
Opens the Profile section so you can change the email or phone, then click Save. Each section of the record saves on its own, and future notices use the new details.

Step 5 — Ordering an Inspection
1. Add Inspection
On the Jobs tab. Choose Quick - repeat last to copy everything from the last job, or Custom for a new requirement. See Ordering a Draw Inspection.
Quick - repeat last is unavailable until the project has its first job.
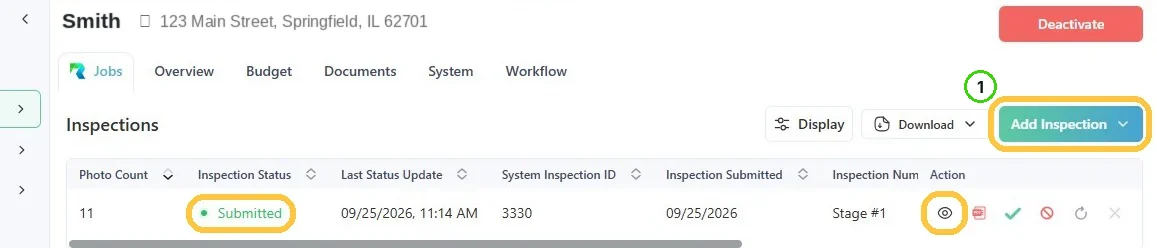
2. Marketplace and Direct Request
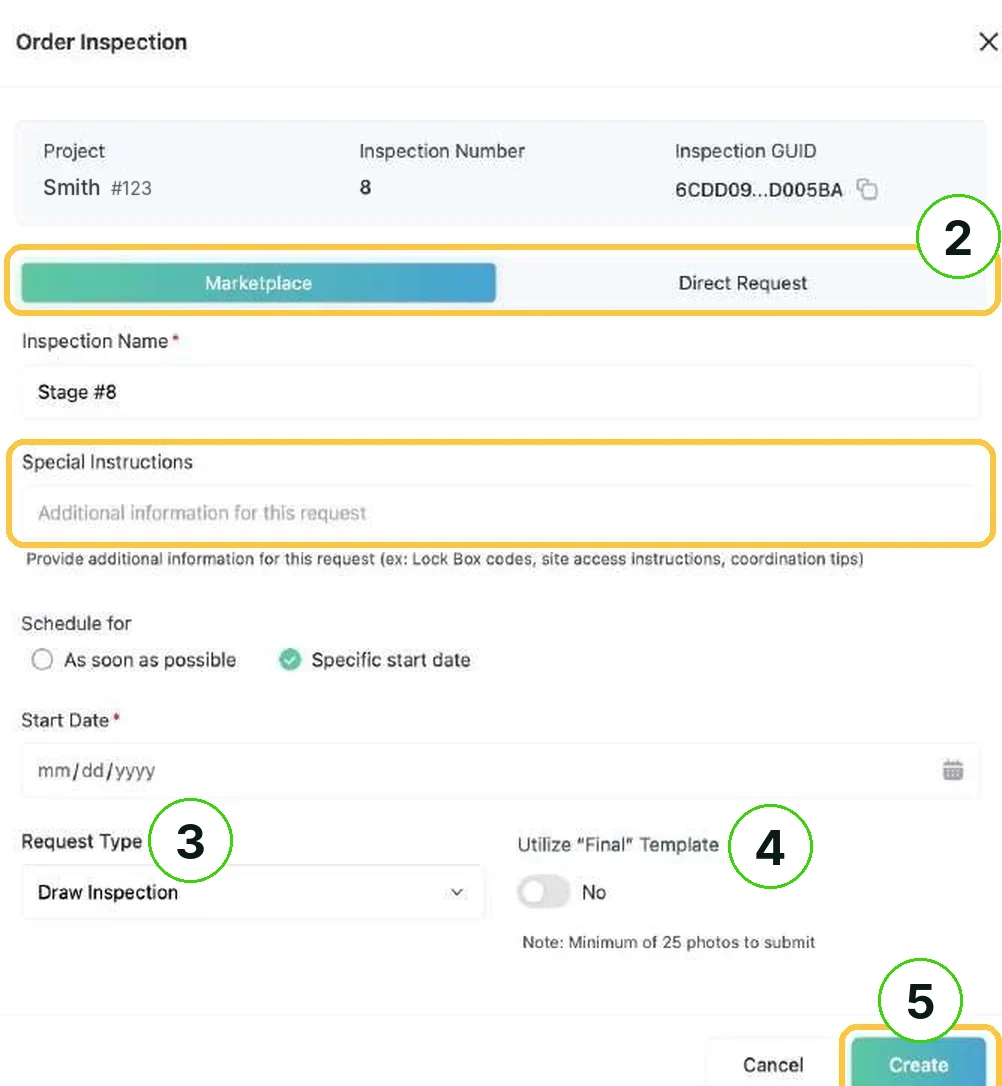
Marketplace: RAZE assigns the best available inspector by location and availability. Direct Request: you pick a specific inspector. The toggle is on Quick, Custom and Workflow orders.
3. Request Type
Draw Inspection or Assessment.
4. Utilize "Final" Template
Set it to Yes on the final draw. The inspector can't submit until 25 photos are attached. See Naming Inspections and Using the Final Template.
5. Create
Places the order. The new job starts as Lender Open.
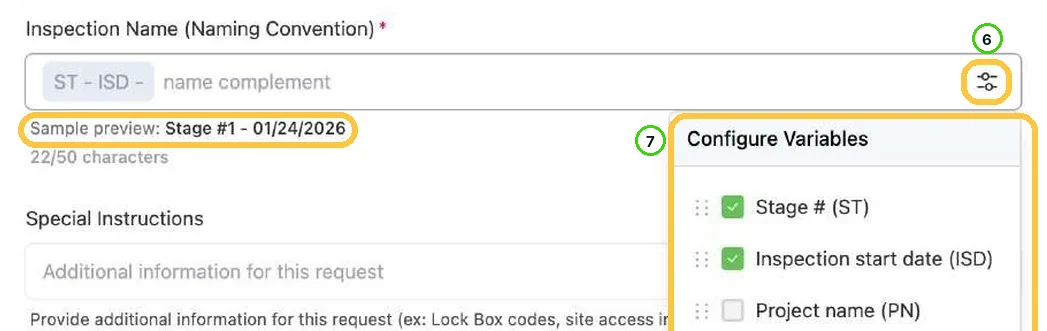
6. Sliders icon
In the Inspection Name field. Opens Configure Variables.
7. Configure Variables
Tick Stage # (ST), Inspection start date (ISD) or Project name (PN), then check the sample preview. Names are limited to 50 characters.
Step 6 — The Workflow Tab
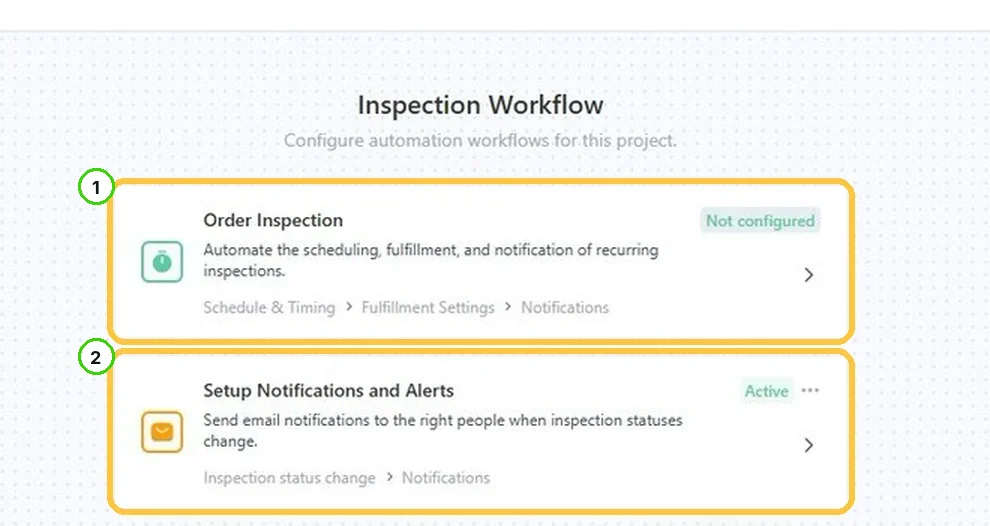
1. Order Inspection
Automates recurring orders: set Schedule & Timing, Fulfillment Settings and Notifications. See Automating Recurring Draws and Alerts.
Check the total number of jobs before you save. Every day for six months means a job every day for six months.
2. Setup Notifications and Alerts
Emails the people you choose each time a status changes. Each card shows Not configured or Active.
Step 7 — Reviewing a Submitted Job
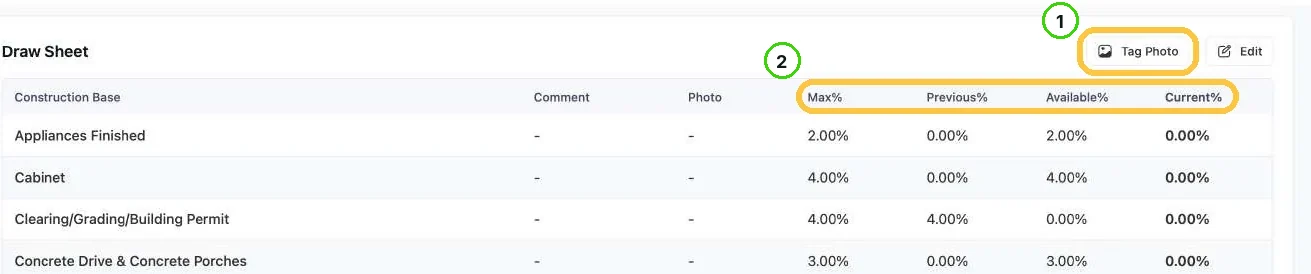
1. Tag Photo
On the Draw Sheet. Attaches a photo to a line. See Reviewing the Inspection.
2. Max %, Previous %, Available % and Current %
Max % is the line's full share, and Previous % was approved on earlier inspections. Available % is what's left. Current % is this visit's entry and can't exceed Available %. See Reading the Draw Sheet.
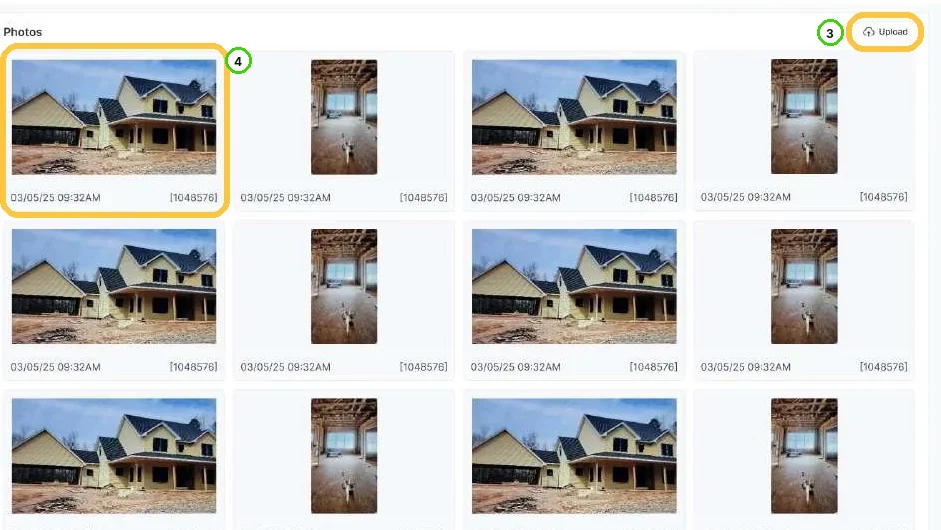
3. Upload
On the Photos tab. Adds photos to the job.
4. A photo
Click a photo to add a Comment, a Photo Guide ID or GPS, then click Save. The date and size are stamped automatically.
Step 8 — The Action Icons and the About Panel
1. Eye
In the Action column of the Jobs tab. Opens the full job. See Approving or Rejecting a Job.
2. Report
Opens the report PDF.
3. Check mark
Accepts the inspection. The status becomes Lender Approved and notices go to everyone involved.
4. Circle
Rejects the inspection. The status becomes Lender Rejected, everyone involved is notified, and the inspector may redo the visit.
Accept and Reject appear once the inspector submits. With auto-approve, submitted inspections move to Lender Approved without a click.

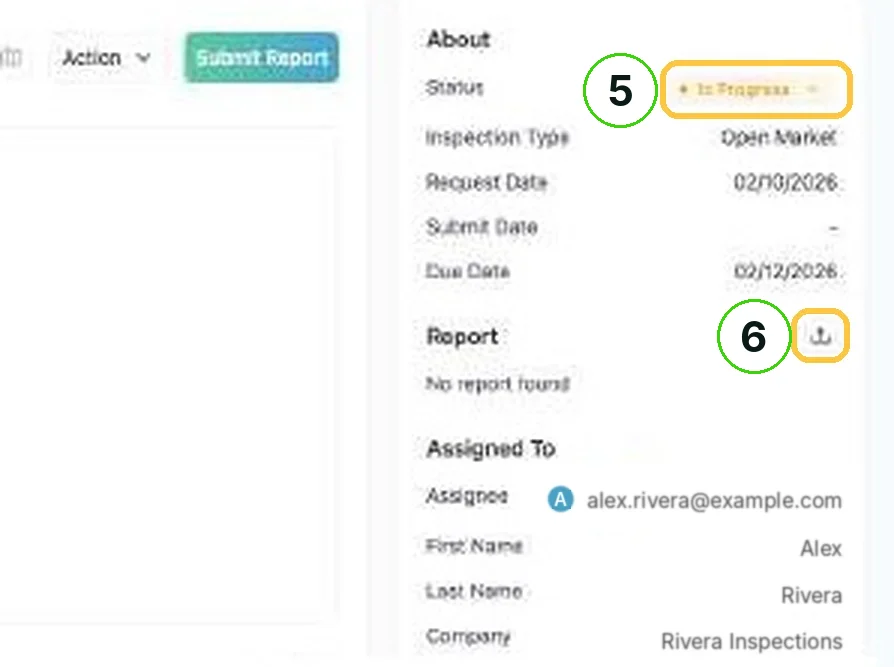
5. Status
In the About panel of an open job. Pick the new status from the dropdown, and notices go to everyone involved. See Understanding Job Statuses.
6. Upload icon under Report
Attaches a PDF report that came from outside RAZE.
Step 9 — Analytics and Ask AI
1. Monthly operations report
A full report you can export as a PDF. Every block has an In report toggle: keep the blocks you need, then export. See Running Reports in Analytics.
2. Open work & aging report
The other full report, built and exported the same way.
3. Preset reports
One click each: Awaiting lender review, Past due, Progress went backwards, Stalled projects, Documentation gaps, Turnaround time, Vendor scorecard and Portfolio exposure.
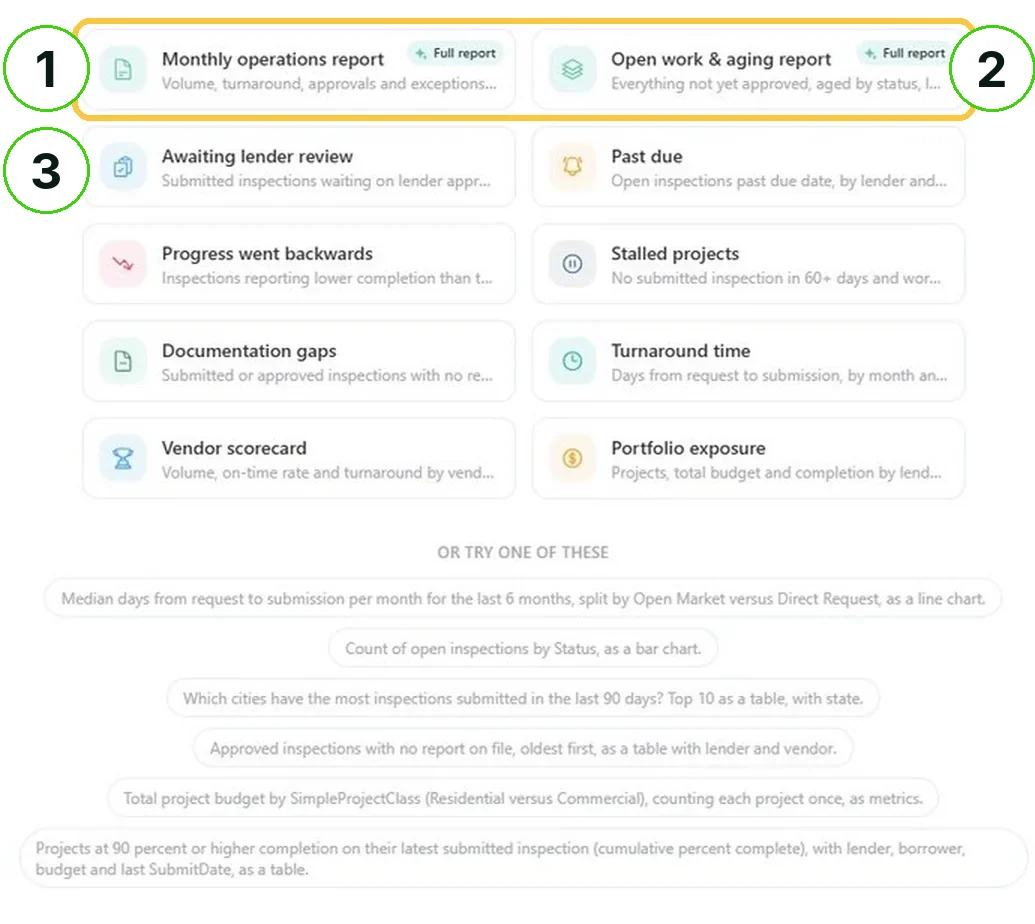
4. Ask box
Type a question in plain language. Shape the answer with words like as a table, as a chart, top 10, last 90 days, by lender, by state or build a report.

5. History
In the Ask AI chat. Keeps every past conversation, read-only. See Using Ask AI.
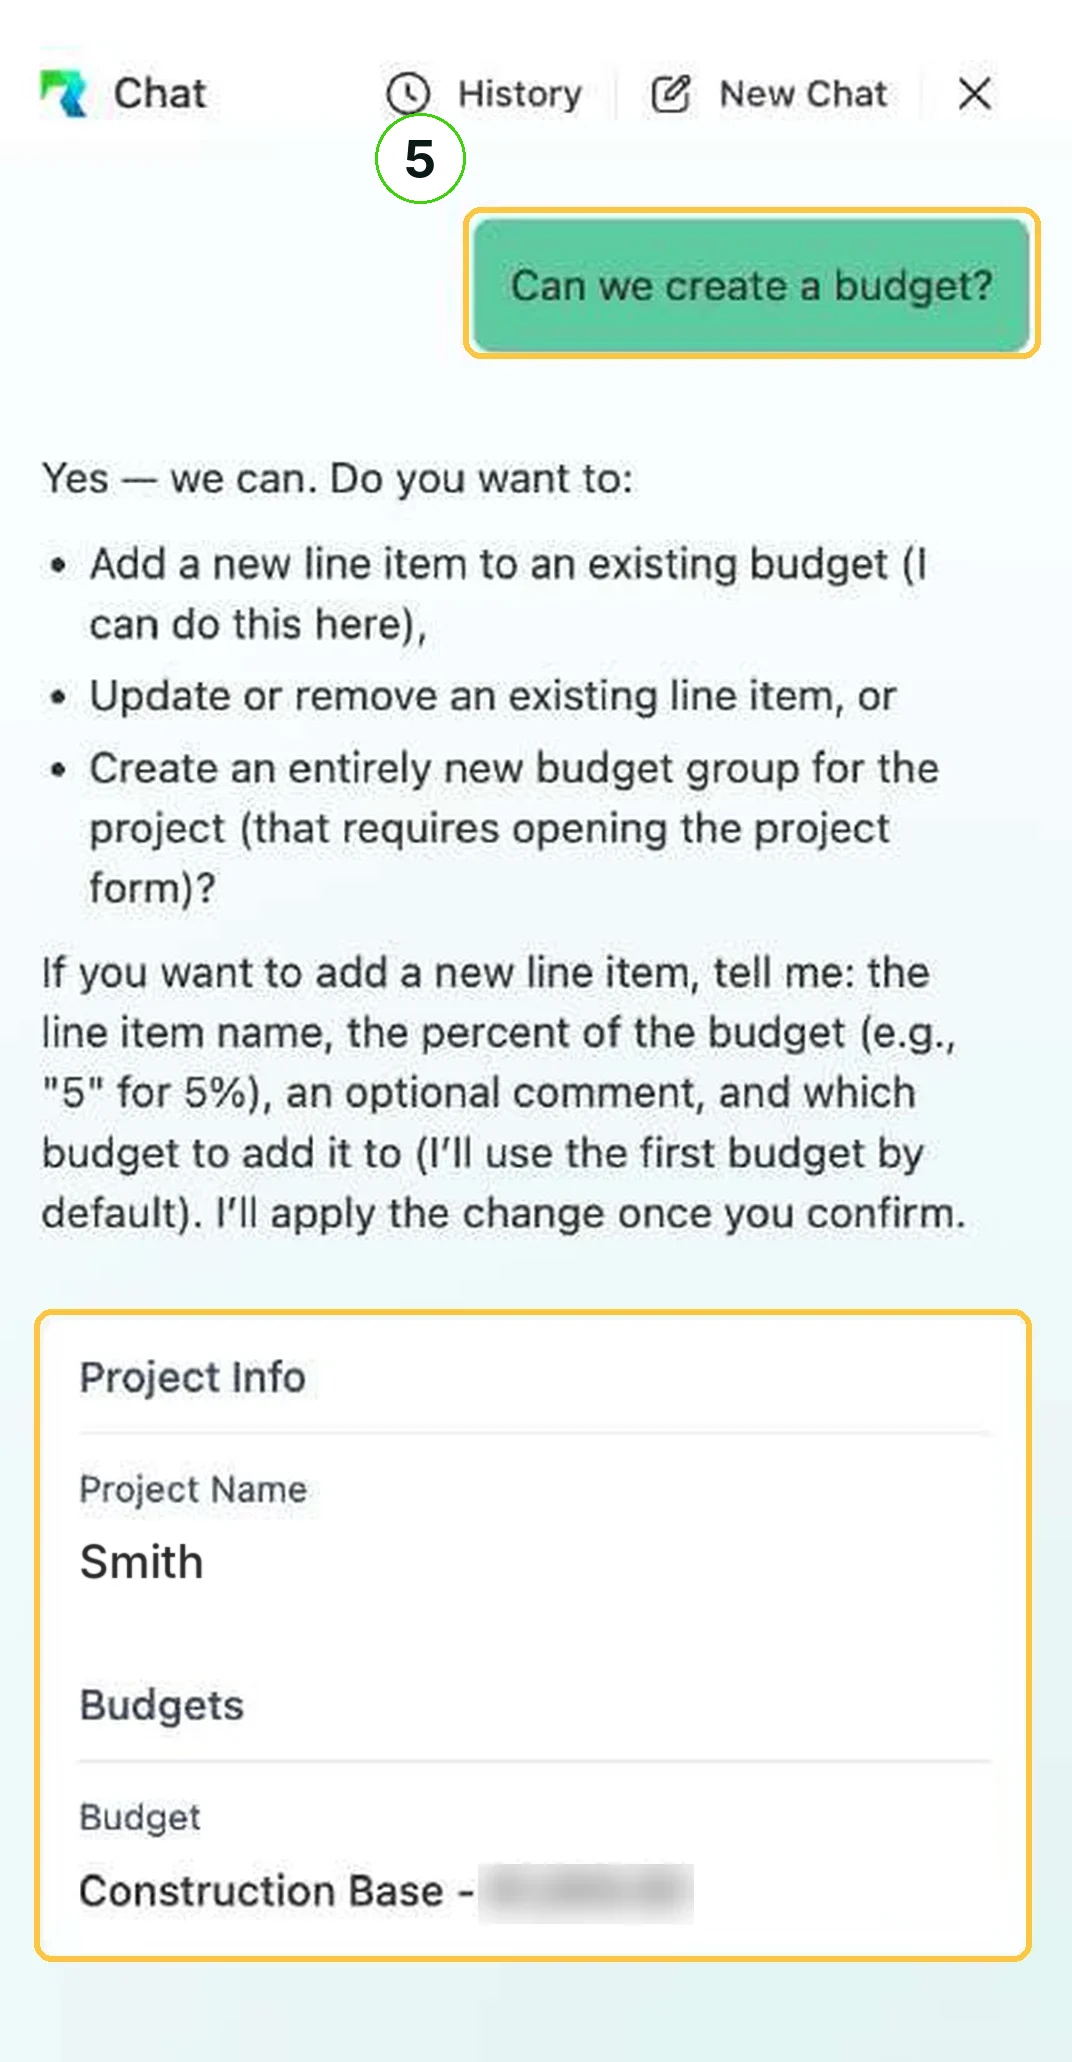
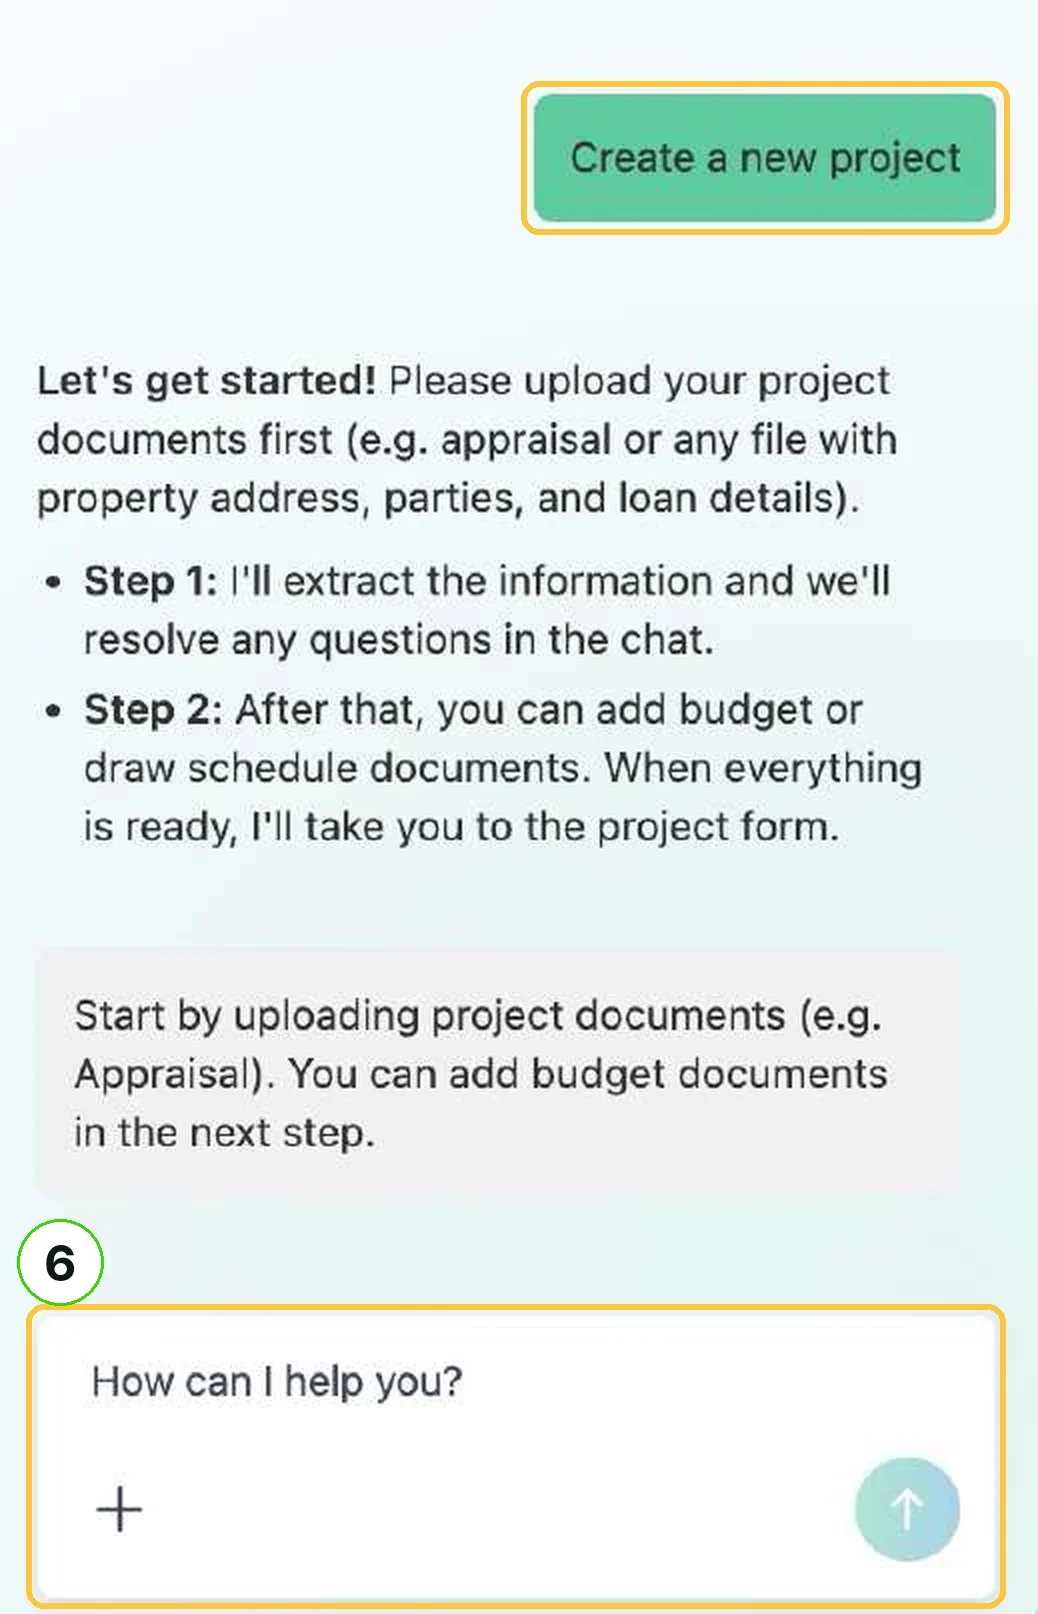
6. Message box
Type a request, for example "Order a draw inspection for next Monday." Ask AI knows the project you're viewing, shows a preview and creates nothing until you confirm.
Tips
DO
- •Check the total number of jobs before you save a recurring order.
- •Use Quick - repeat last for the next draw on a project that already has a job.
- •Read flagged answers and photos before you click the check mark.
- •Copy the Project GUID from the System tab for any support request.
WATCH FOR
- •The circle in the Action column. It rejects the inspection.
- •The Institution. It is hard to change once inspections exist.
- •Utilize "Final" Template. The inspector needs 25 photos to submit.
- •Budget lines that don't total exactly 100%. Saving is blocked.
Troubleshooting
Lender workflow
- Button glossary (this guide)
Use this guide with AI.
Ask RAZE AI here, or hand the plain-text guide to the assistant you already use.
Was this guide helpful?
Still stuck? Ask RAZE.
Ask RAZE AI for an instant answer from these guides, or send a request and the RAZE support team replies by email.
Ask RAZE AI.
Instant answers from these guides, any time.
Send a support request.
Tell us the product and guide; the form is here.
Call or email.