Approving or Rejecting a Job
Accept or reject a submitted inspection in one click, and notices go to everyone involved automatically.
Quick Reference
Find the Submitted job on the Jobs tab.
Click the check mark to Accept or the circle to Reject.
Or open the job and set the Status in the About panel.
Notices go out automatically.
Before You Start
You have reviewed the inspection.
The job's status is Submitted.
Step 1 — Know the Action Icons
Open, Report, Accept, Reject
The eye opens the full job, Report opens the PDF, the check mark accepts, and the circle rejects. Accept and Reject appear once the inspector submits.

Step 2 — Accept or Reject
One click
On the Submitted job's row, click the check mark to set Lender Approved, or the circle to set Lender Rejected. The inspector may redo a rejected visit.
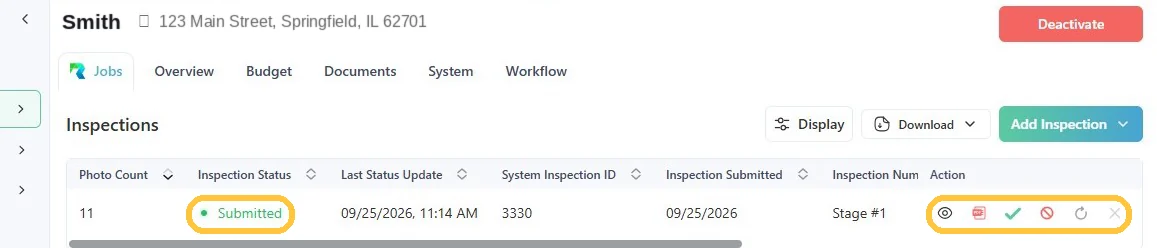
No separate email needed. Both send notices to everyone involved.
Step 3 — Know Your Approval Mode
Auto-approve
If your institution uses auto-approve, submitted inspections move to Lender Approved without a click. It's an institution setting, so ask your administrator or RAZE support which mode applies.
Tips
DO
- •Review the Questionnaire, Draw Sheet, and Photos first.
- •Click Report to open the inspection PDF.
WATCH FOR
- •Accept and Reject appear only after the inspector submits.
- •With auto-approve on, jobs approve without a click.
Troubleshooting
Use this guide with AI.
Ask RAZE AI here, or hand the plain-text guide to the assistant you already use.
Was this guide helpful?
Still stuck? Ask RAZE.
Ask RAZE AI for an instant answer from these guides, or send a request and the RAZE support team replies by email.
Ask RAZE AI.
Instant answers from these guides, any time.
Send a support request.
Tell us the product and guide; the form is here.
Call or email.