Inspector Portal Button Glossary
Every key button in the RAZE Inspector Portal, screen by screen, with what happens when you click it.
Runs on: Desktop and tablet. A web app you open in a browser; it is not built for phones.
Quick Reference
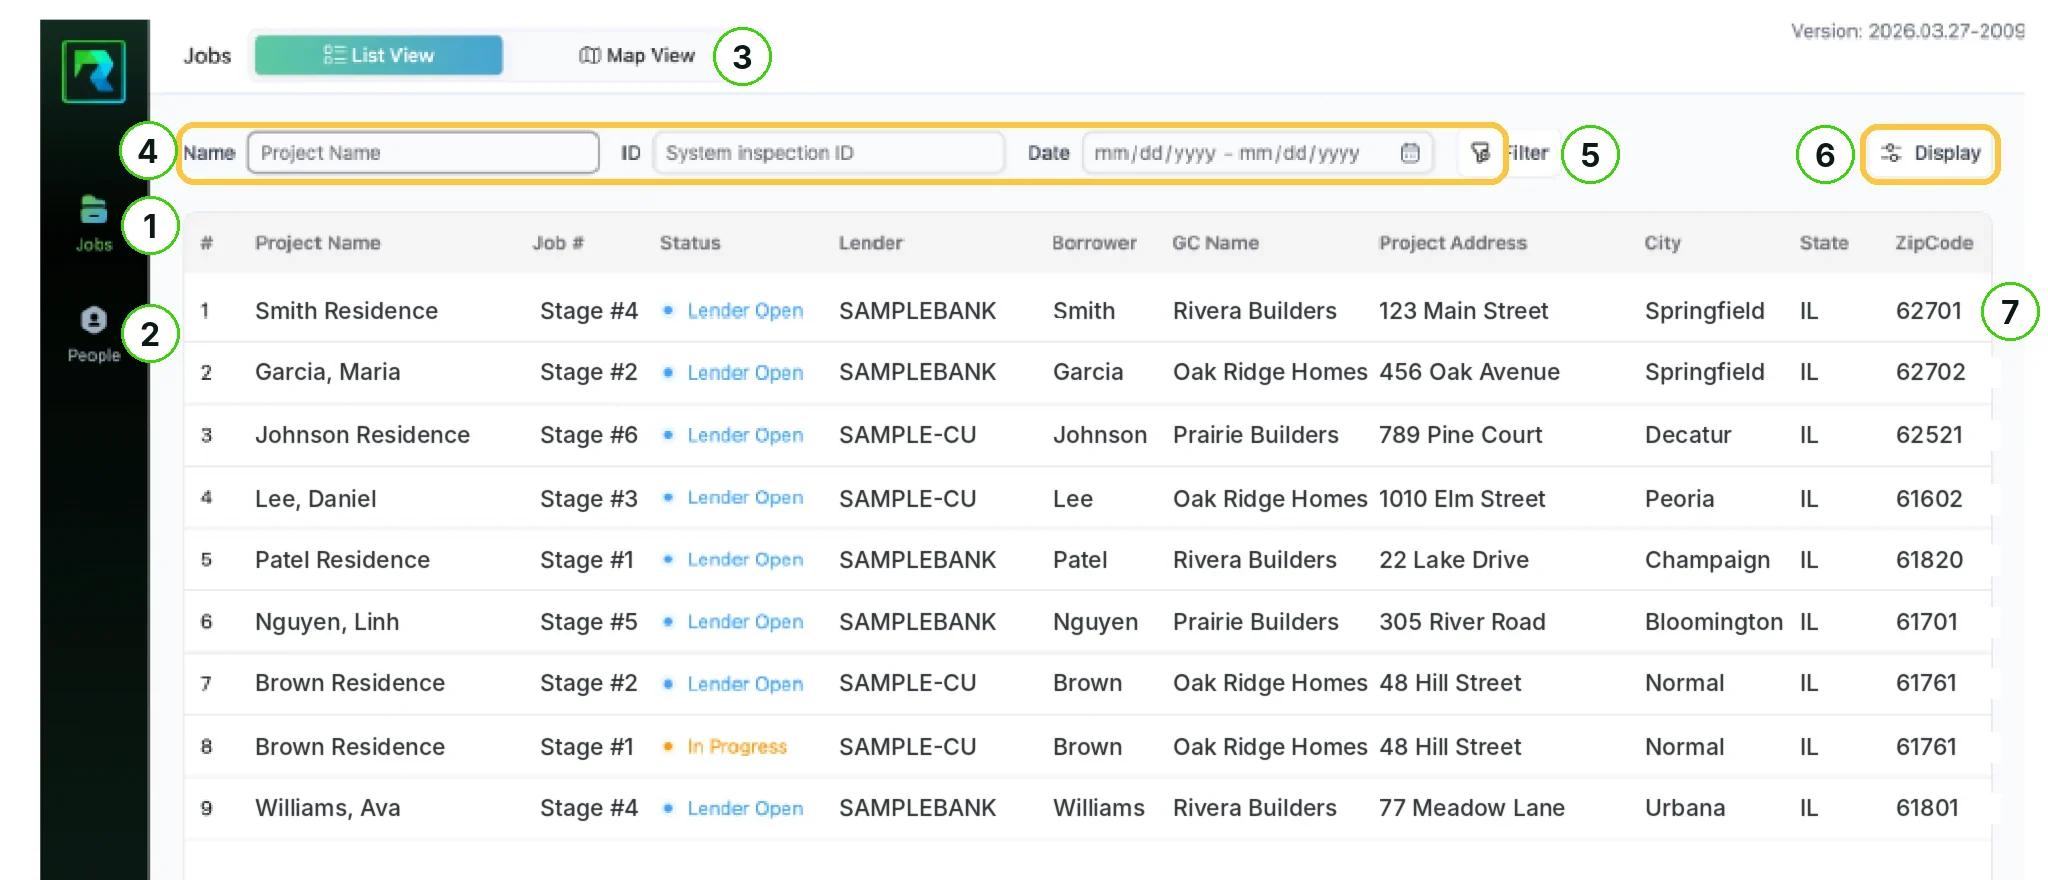
Each screen below is numbered. The number on the picture is the number in the list.
Submit Report sends your report to the lender. Save keeps a Questionnaire page as you go.
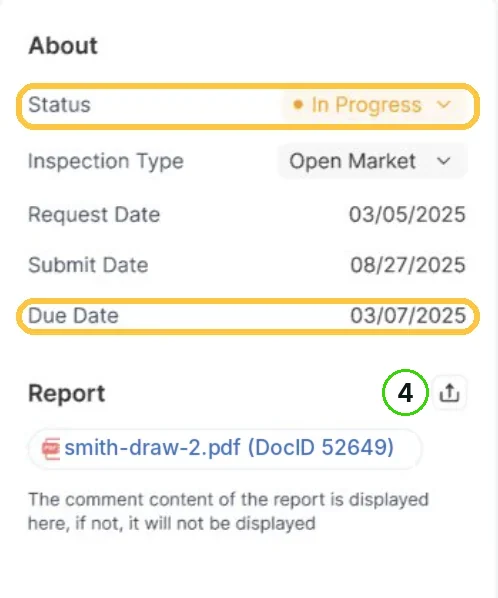
The status badge in the About panel is a button: click it to change the status.
Lender Rejected greys out Submit Report until the status is back to In Progress.
Before You Start
You're signed in at portal.getaraze.com with your own RAZE account.
People and the team screens show only for company managers and admins.
For the full steps, open the guide the button belongs to. Each item names it.
Step 1 — The Jobs List and Map View
1. Jobs
In the left sidebar. It opens the Jobs list, one row per inspection, which is where you land after you sign in. See Finding Your Jobs in the Jobs List.
2. People
In the left sidebar, for company managers and admins. It lists every inspector registered under your company. See Managing Your Inspector List.
3. Map View
Beside List View at the top of Jobs. It shows every assigned inspection as a pin on the map, so you can see which properties sit close to each other. List View shows the same assignments as a table. See Planning Your Route with Map View.
4. Name, ID and Date
Type in Name or ID, or set a Date range, to narrow the table. See Finding Your Jobs in the Jobs List.
5. Filter
Opens the Advanced Filters panel on the right. See Filtering the Job Queue.
6. Display
Chooses which columns show, so the view fits the way you work.
7. A job row
Each row is a property to inspect. Click any row to open the job on its Overview tab.
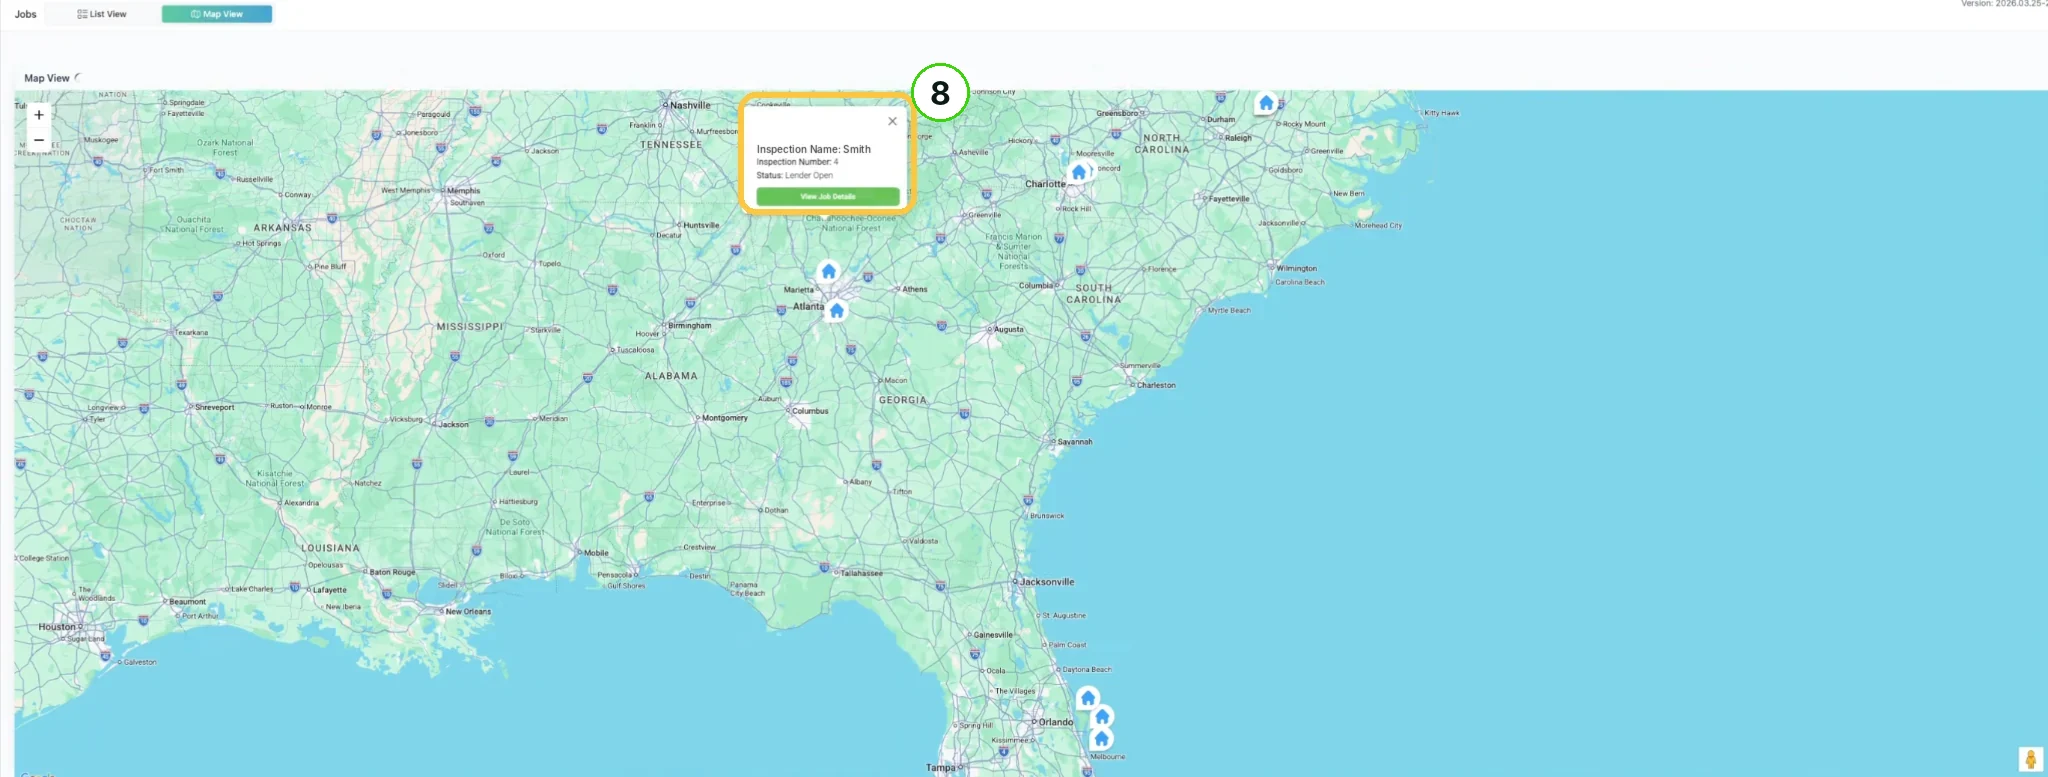
8. View Job Details
Click any pin on the map: a card shows the Inspection Name, Inspection Number and Status, so you can confirm the job before you head out. View Job Details opens the job. See Planning Your Route with Map View.
Step 2 — Advanced Filters
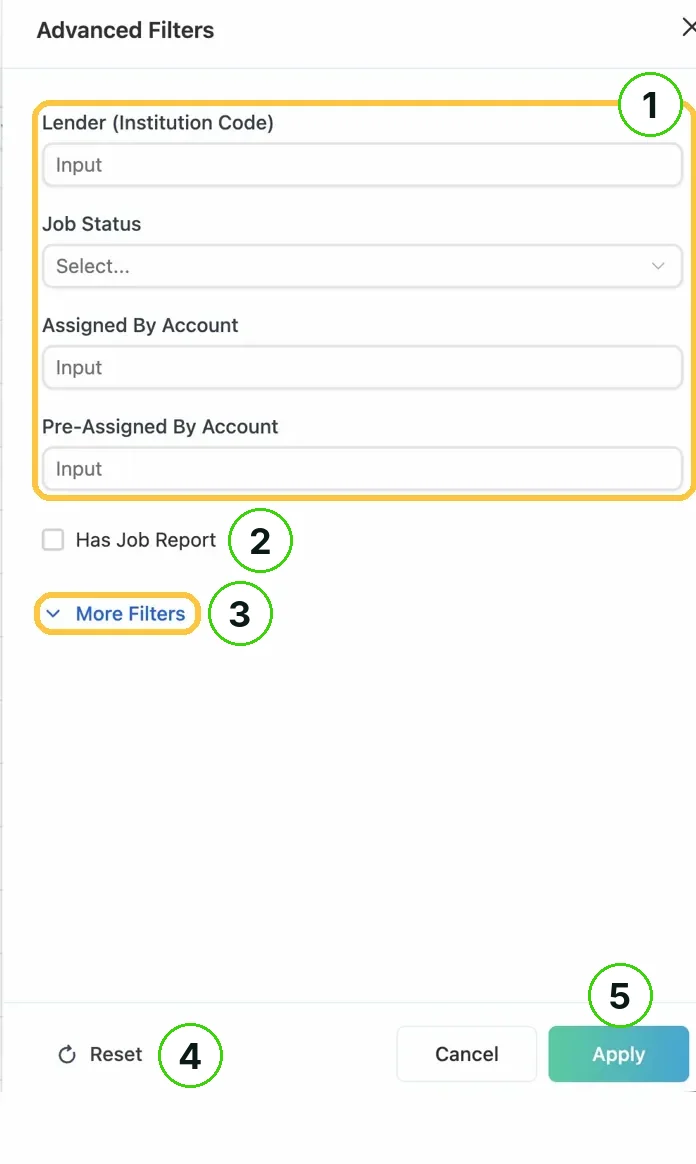
1. Lender, status and assignment
Narrow the list by Lender (Institution Code), Job Status, Assigned By Account or Pre-Assigned By Account. See Filtering the Job Queue.
2. Has Job Report
Tick it to keep only the jobs that already have a report attached.
3. More Filters
Opens the extra filters, from External Instance Code to Max Records. Less Filters folds them away again.
4. Reset
Clears every active filter and returns to the full view.
5. Apply
Refreshes the list with your filters.
Managers use the extra filters to audit specific jobs or build a focused work list for the team.
Step 3 — The Job Page and Its Status
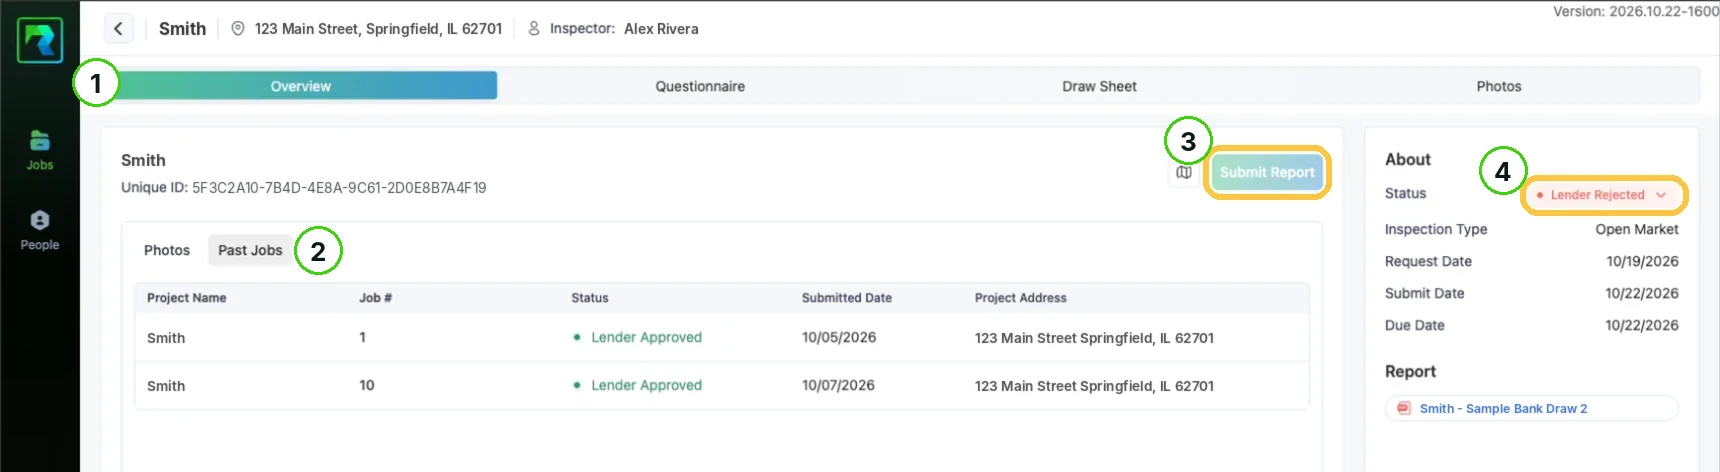
1. Overview, Questionnaire, Draw Sheet and Photos
The four tabs hold the whole inspection: everything you complete, document and submit. The job opens on Overview. See Reading the Job Overview.
2. Past Jobs
On Overview. It lists earlier inspections on the project with their status and submitted date.
3. Submit Report
At the top right of the job. It opens Customize Report, then the report preview, where you send the report. It is greyed out while the status is Lender Rejected. See Submitting the Report.
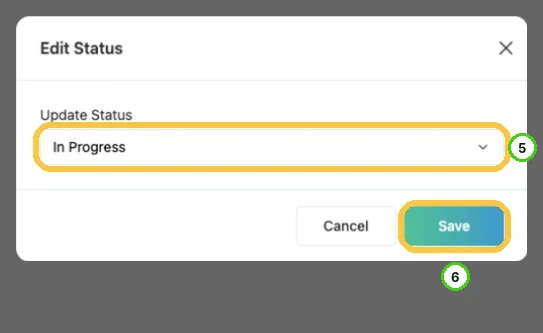
4. Status badge
In the About panel. Click it to open Edit Status. Changing the status sends automatic notifications to everyone on the job. See Reopening an Inspection After a Rejection.
5. Update Status
Lists Lender Open, In Progress, Submitted and Lender Rejected. To fix a rejected report, choose In Progress.
6. Save
Saves the new status. A Status updated message appears and the badge shows the new status.
After a rejection, Submit Report comes back only with the status change. Editing the Draw Sheet or adding photos won't turn it back on.
Step 4 — The Questionnaire
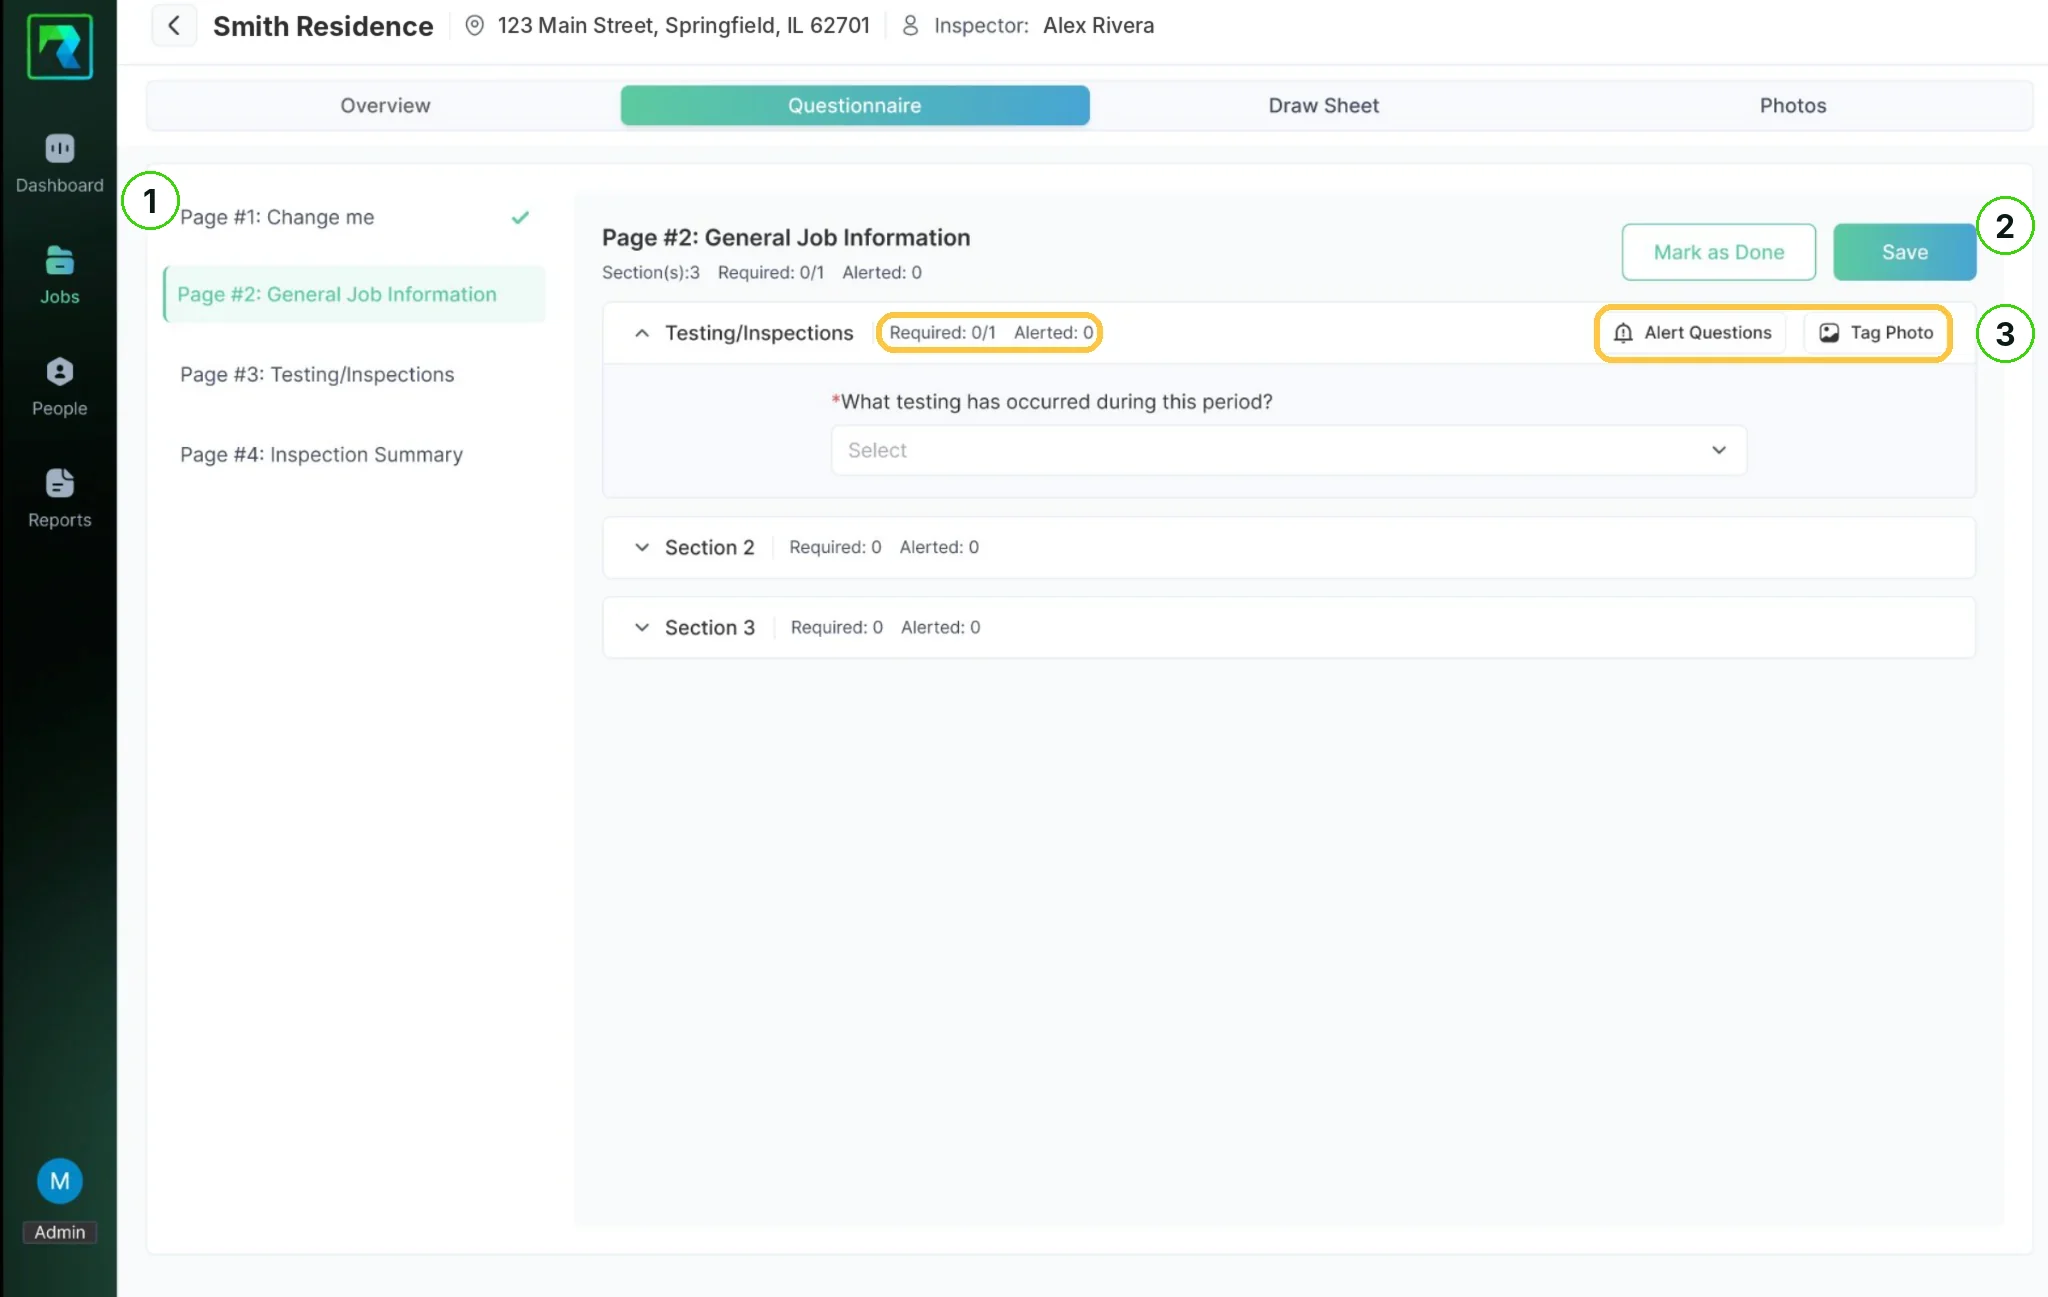
1. Page list
On the left. Each page holds collapsible sections of questions; work through the pages in order. See Completing the Questionnaire.
2. Save
At the top of each page. Click it as you go.
3. Tag Photo
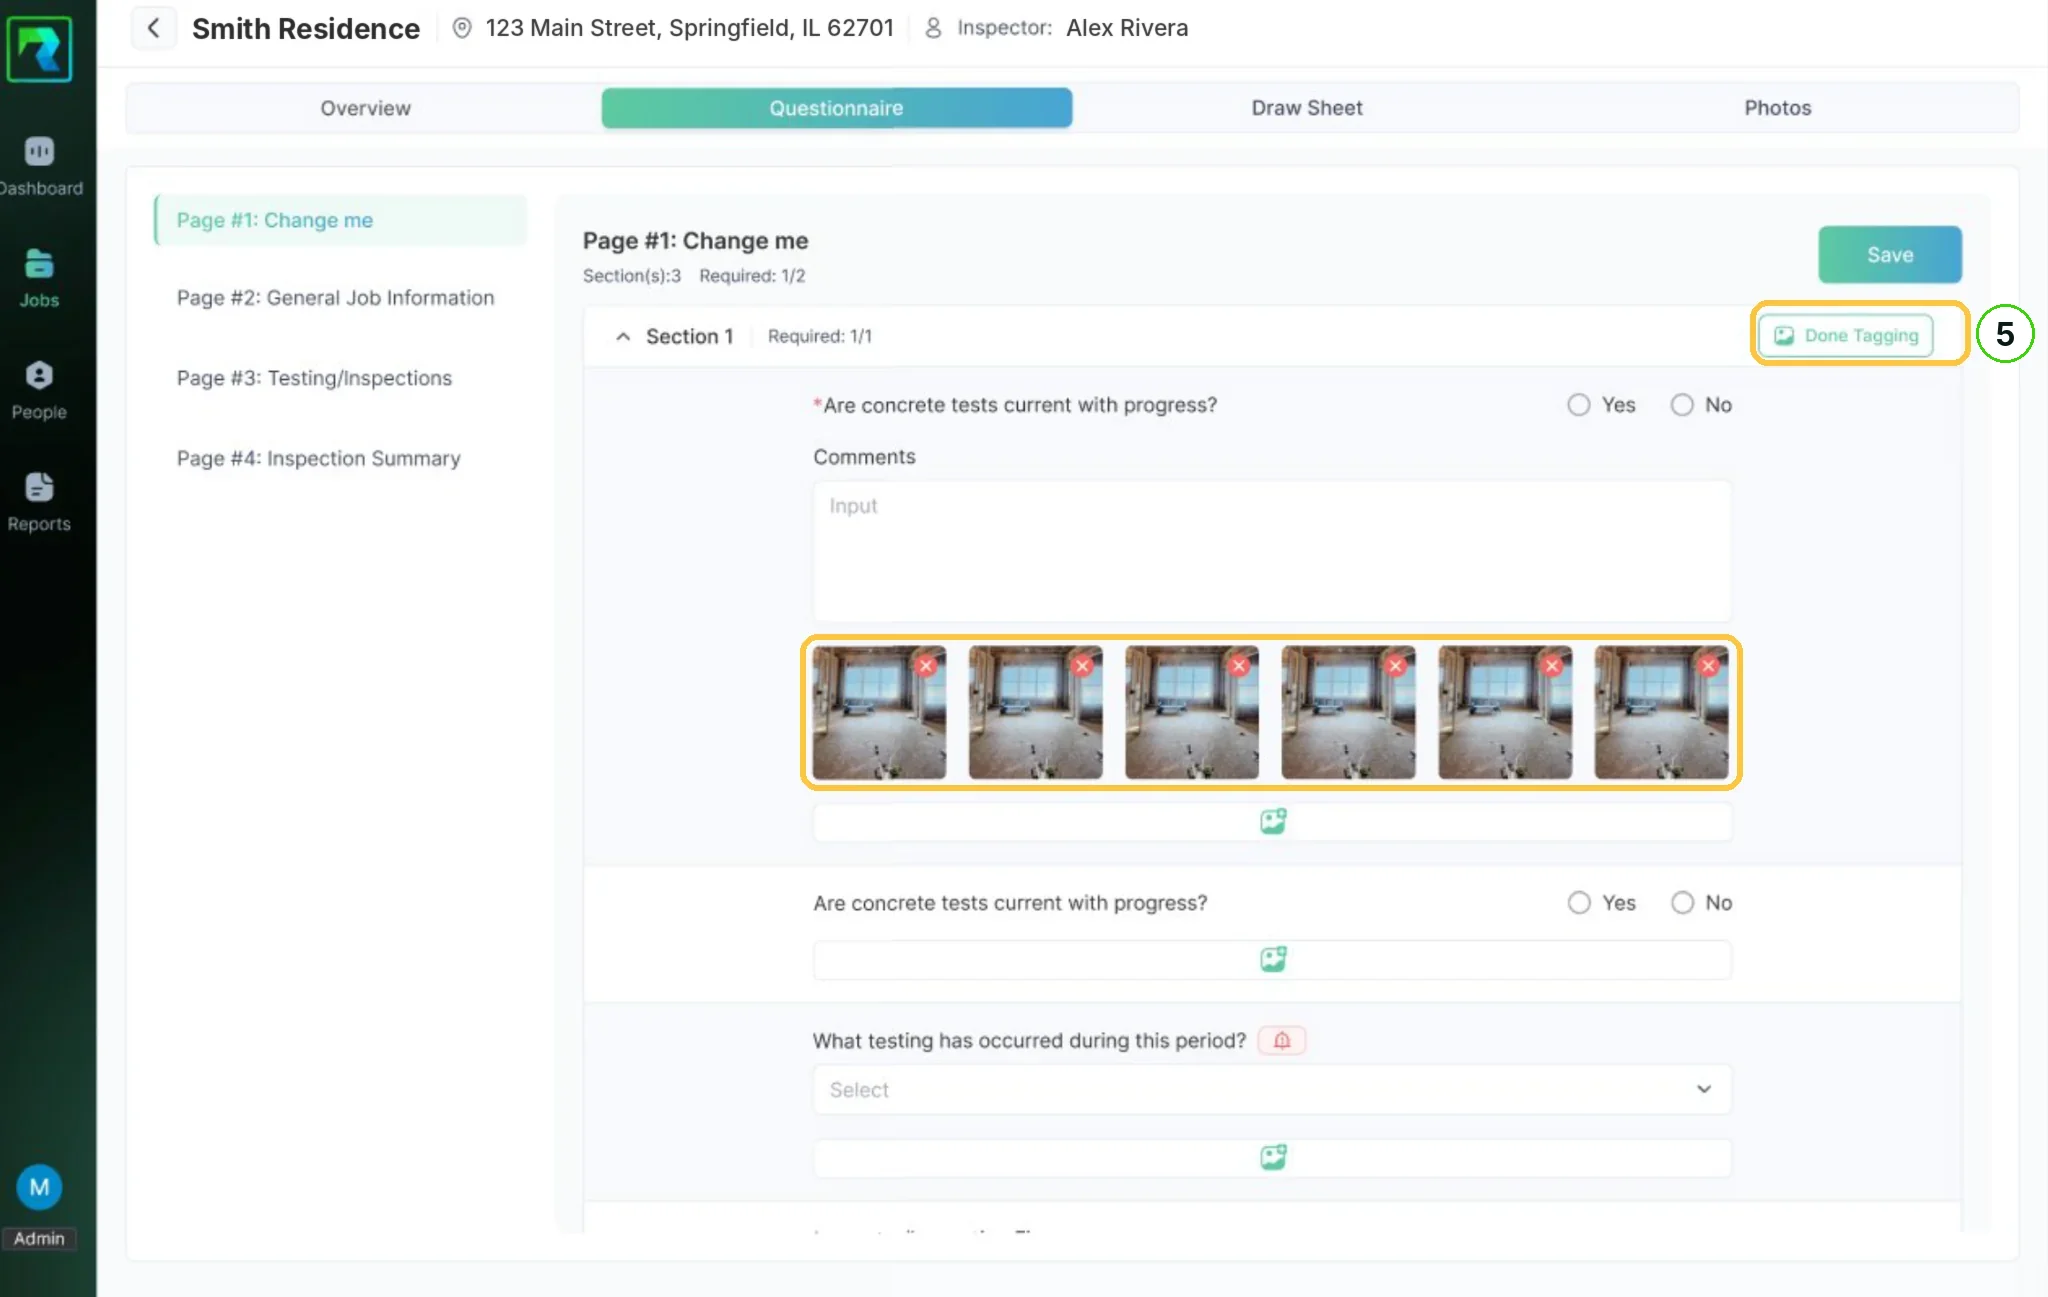
At the top of each section. Click it, pick the photos that support the answer, then click Done Tagging.
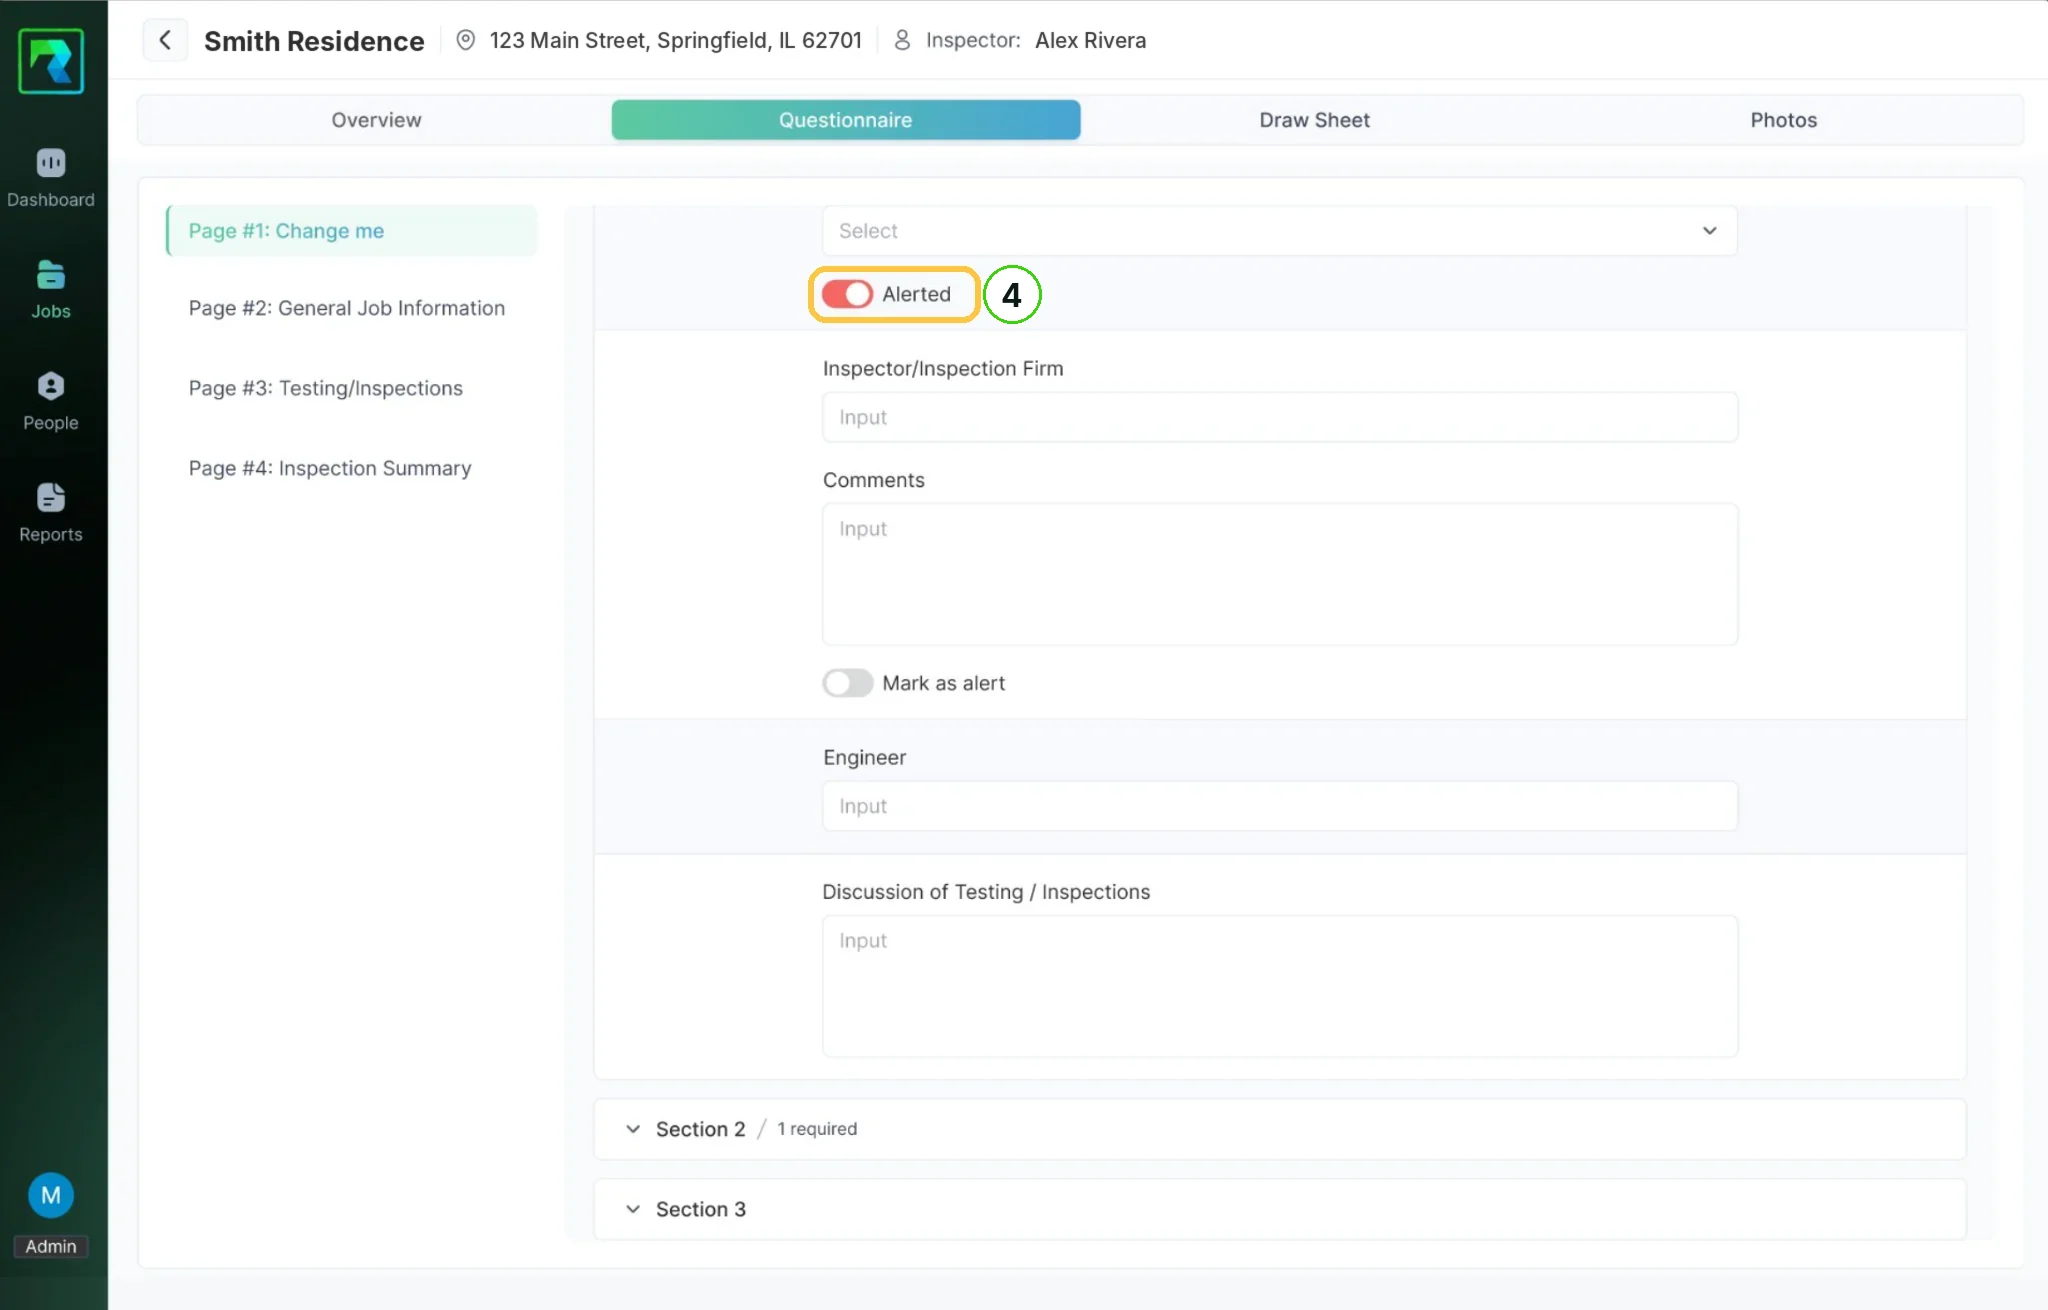
4. Alerted
The toggle under an answer. Turn it on when the answer needs the lender's attention: alerted items are highlighted in the summary, so reviewers find them without reading the whole form.
5. Done Tagging
Click it once you have picked the photos. Tagged photos appear under the question and link your observation to its evidence.
Step 5 — The Draw Sheet and Photos
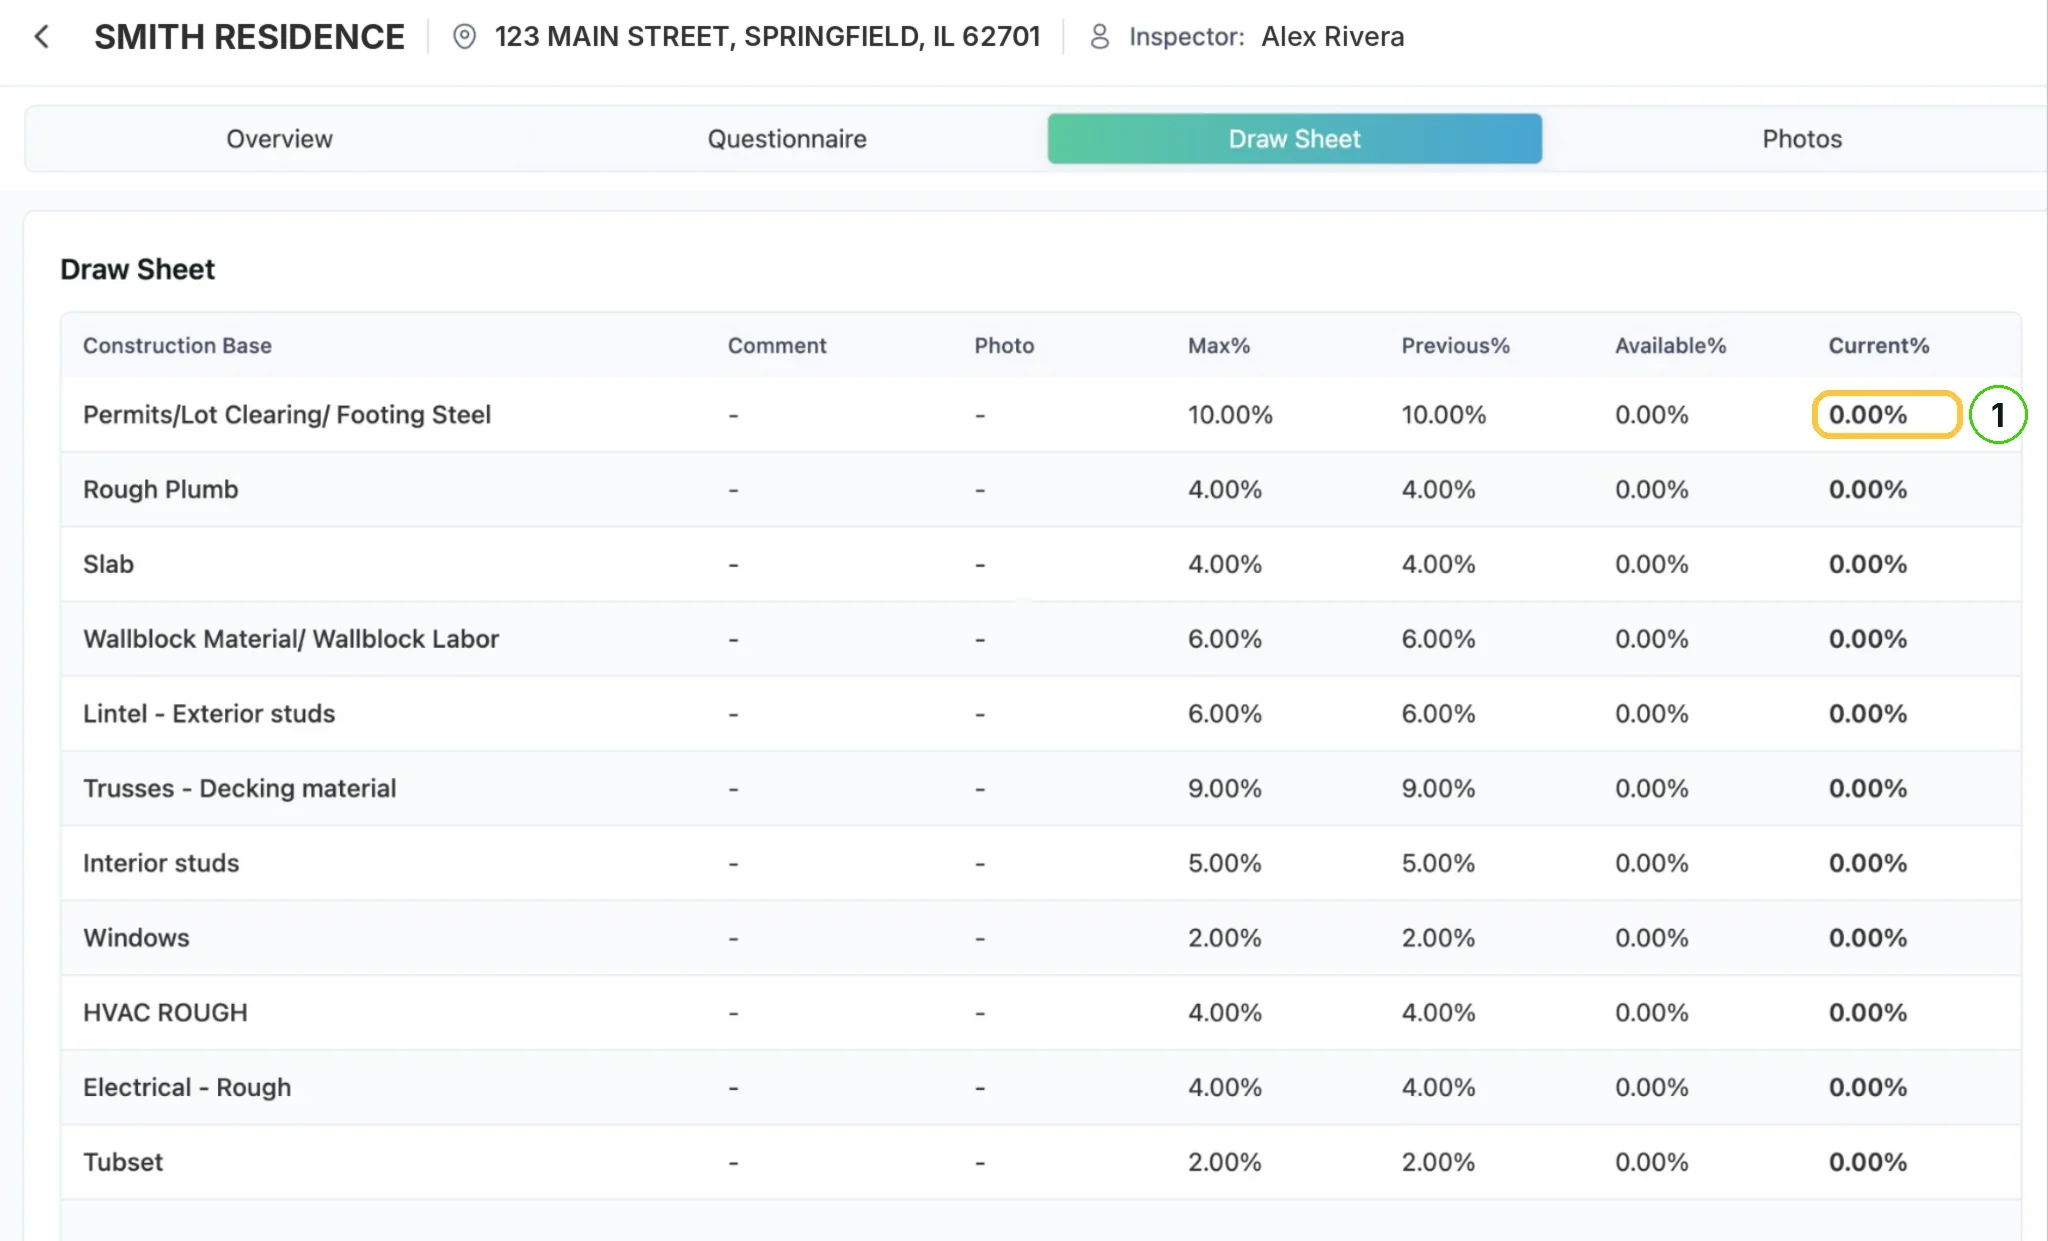
1. Current%
Enter the total approved progress to date for each line item, not only the work since your last visit. Available% is your hard limit. See Completing the Draw Sheet.
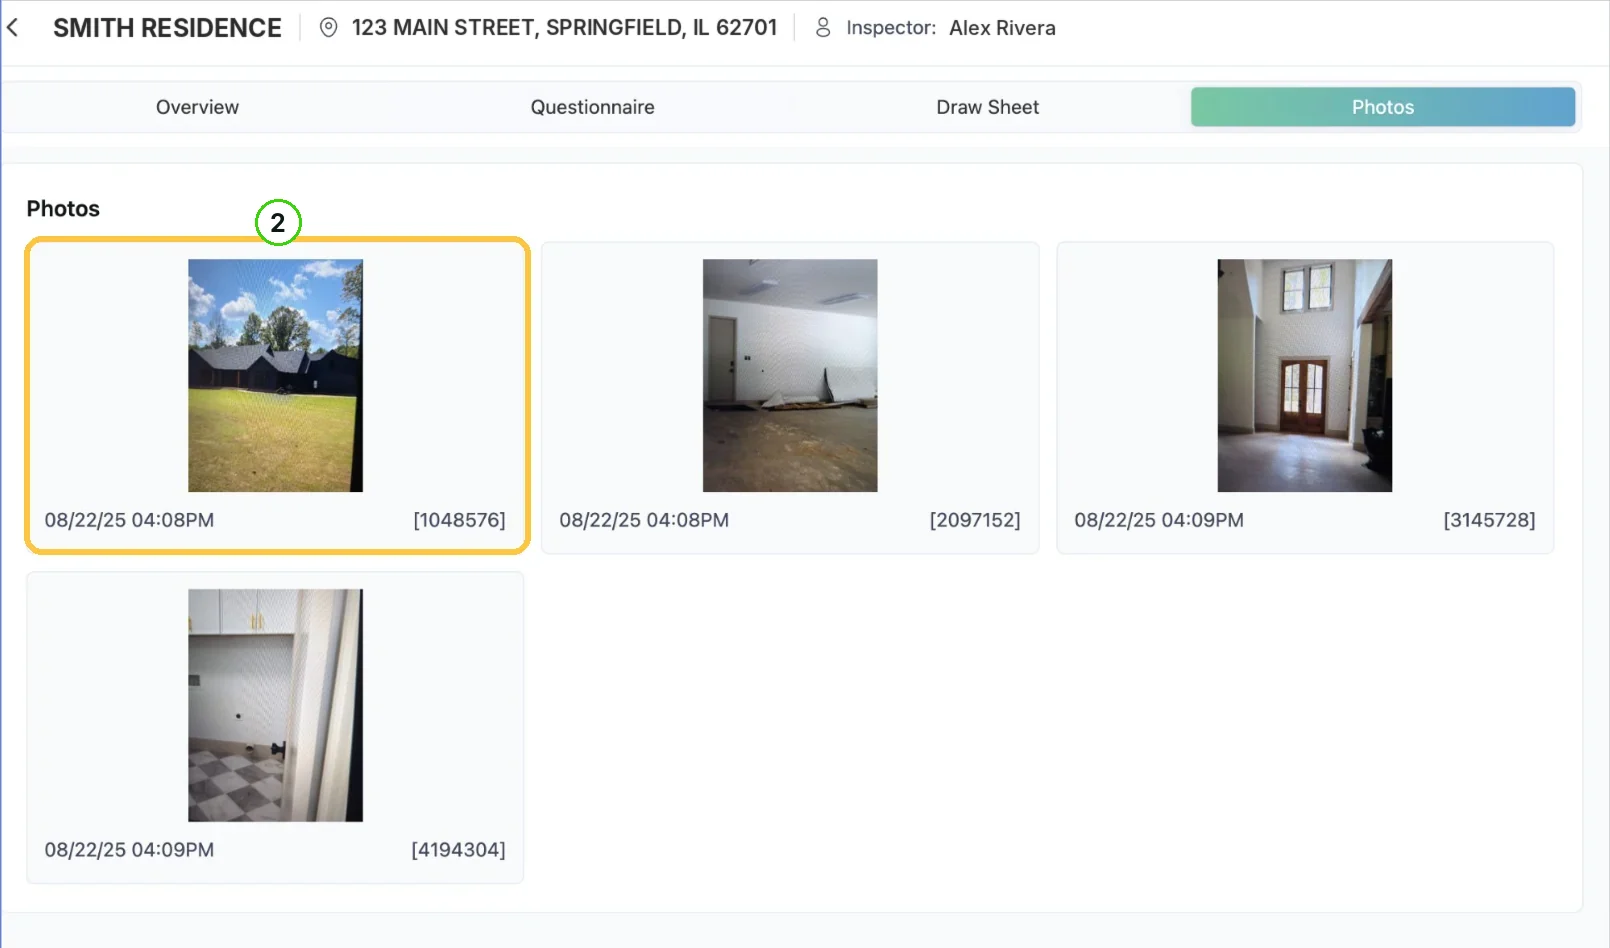
2. Photo card
Each photo on the job is a card with its timestamp and file size. Click a photo to edit it, or click Upload to add photos. See Uploading and Tagging Photos.
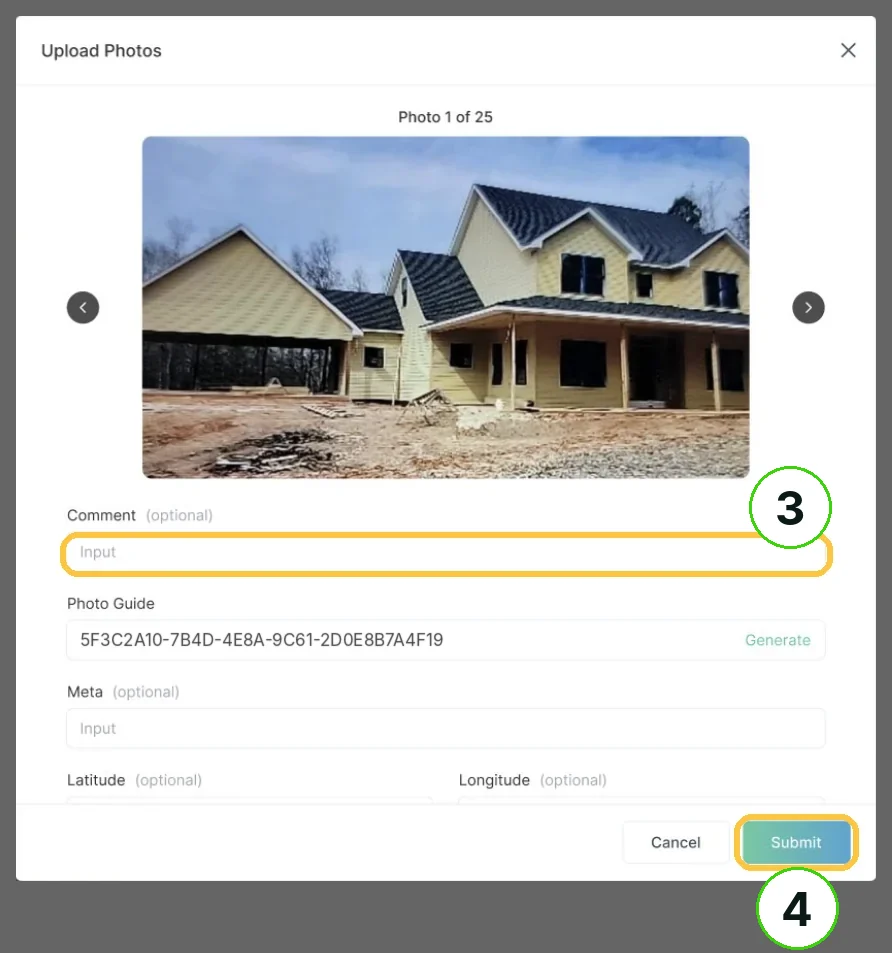
3. Comment
The Upload Photos window steps through the photos one at a time. Add a Comment to each, and Latitude and Longitude if you want the location on record.
4. Submit
Click it once the photos and their details are ready.
Step 6 — Submitting the Report
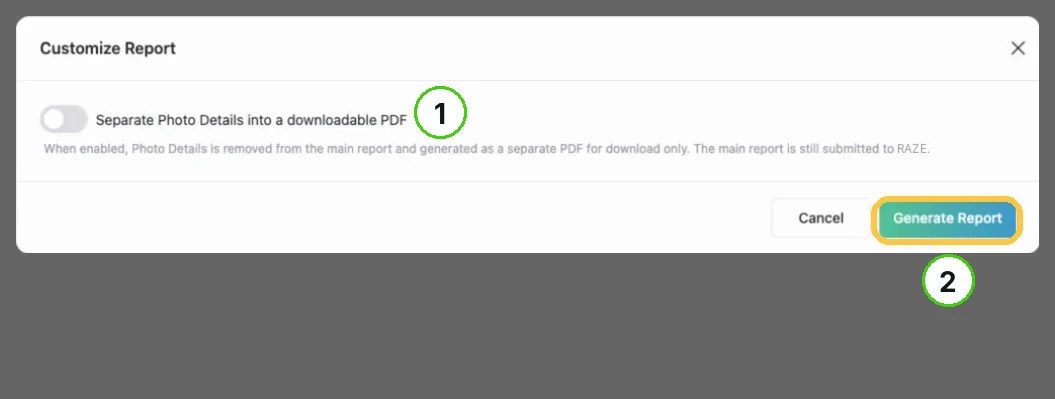
1. Separate Photo Details
Turn on Separate Photo Details into a downloadable PDF only if you want the photo details as a separate download. The main report is still submitted to RAZE. See Submitting the Report.
2. Generate Report
Builds the report and opens its preview.
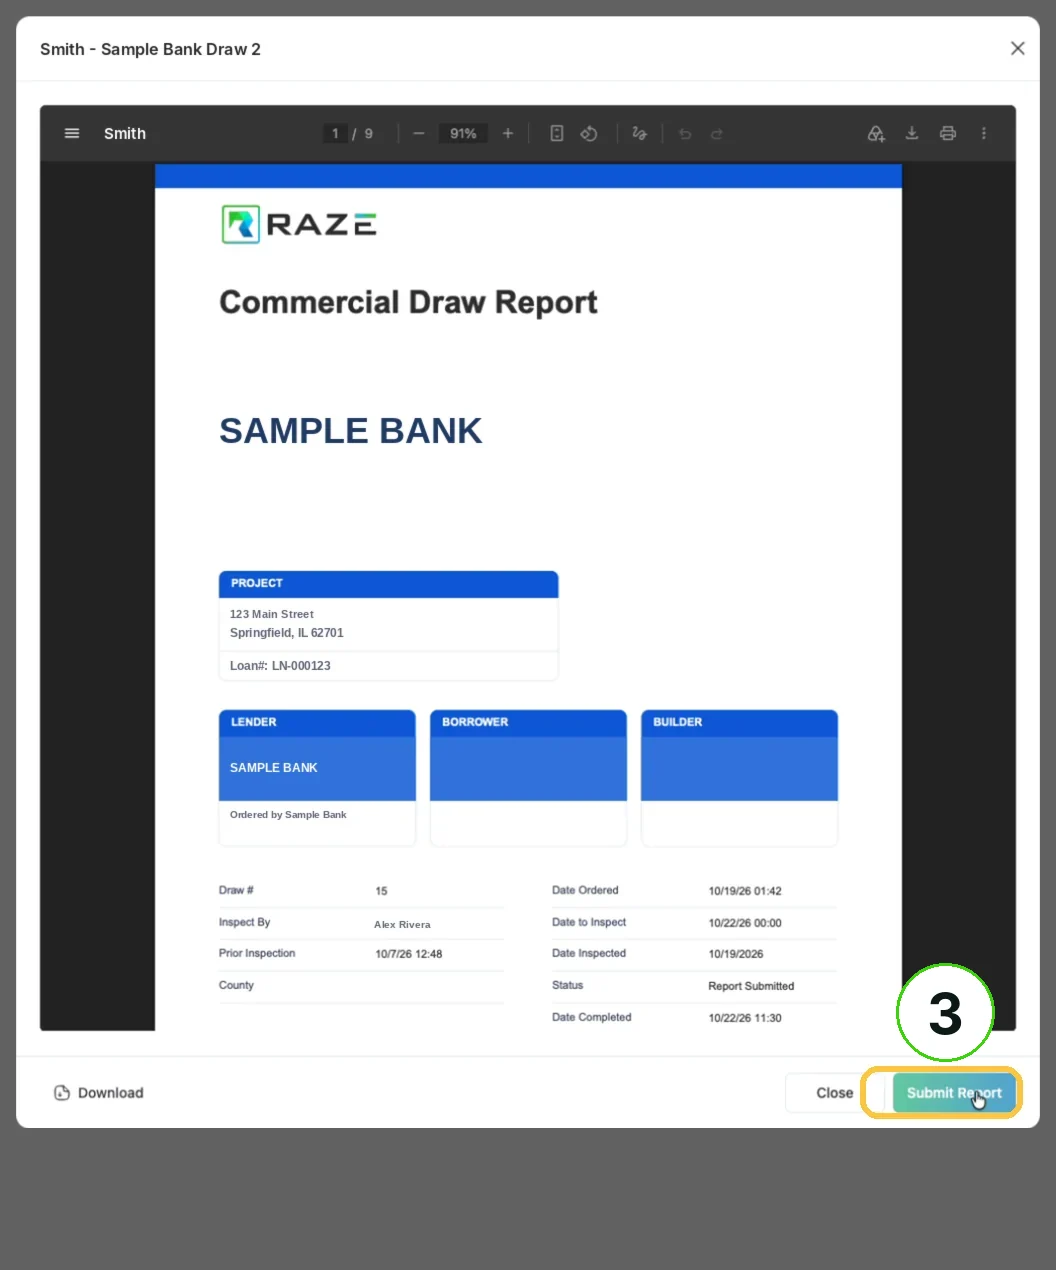
3. Submit Report
At the bottom of the preview. Check the pages, then click it: the status changes to Submitted and the lender is notified in the Ordering Engine.
4. Upload icon
In the About panel's Report block. It opens Upload PDF, to attach a PDF to the job.
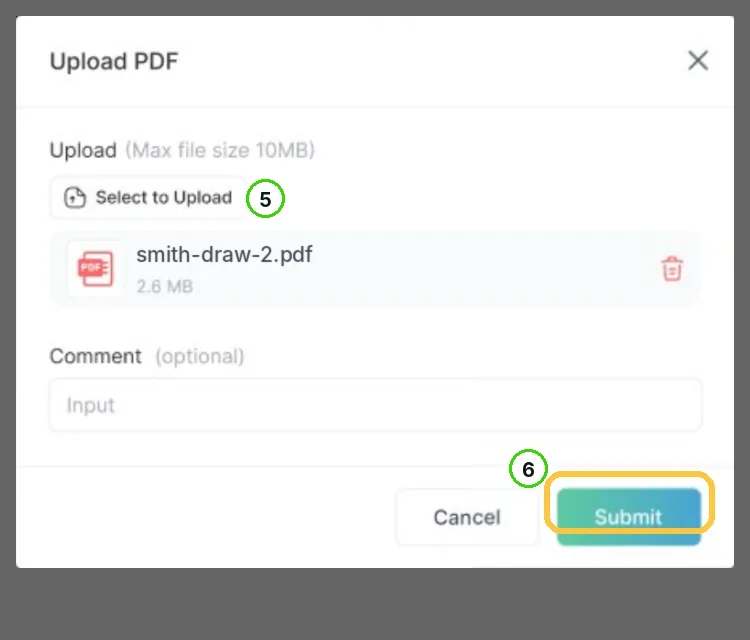
5. Select to Upload
Picks the file, 10 MB at most. The file appears with its size.
6. Submit
Attaches the PDF. Add a Comment first if the lender needs context.
Step 7 — People and Inspector Profiles
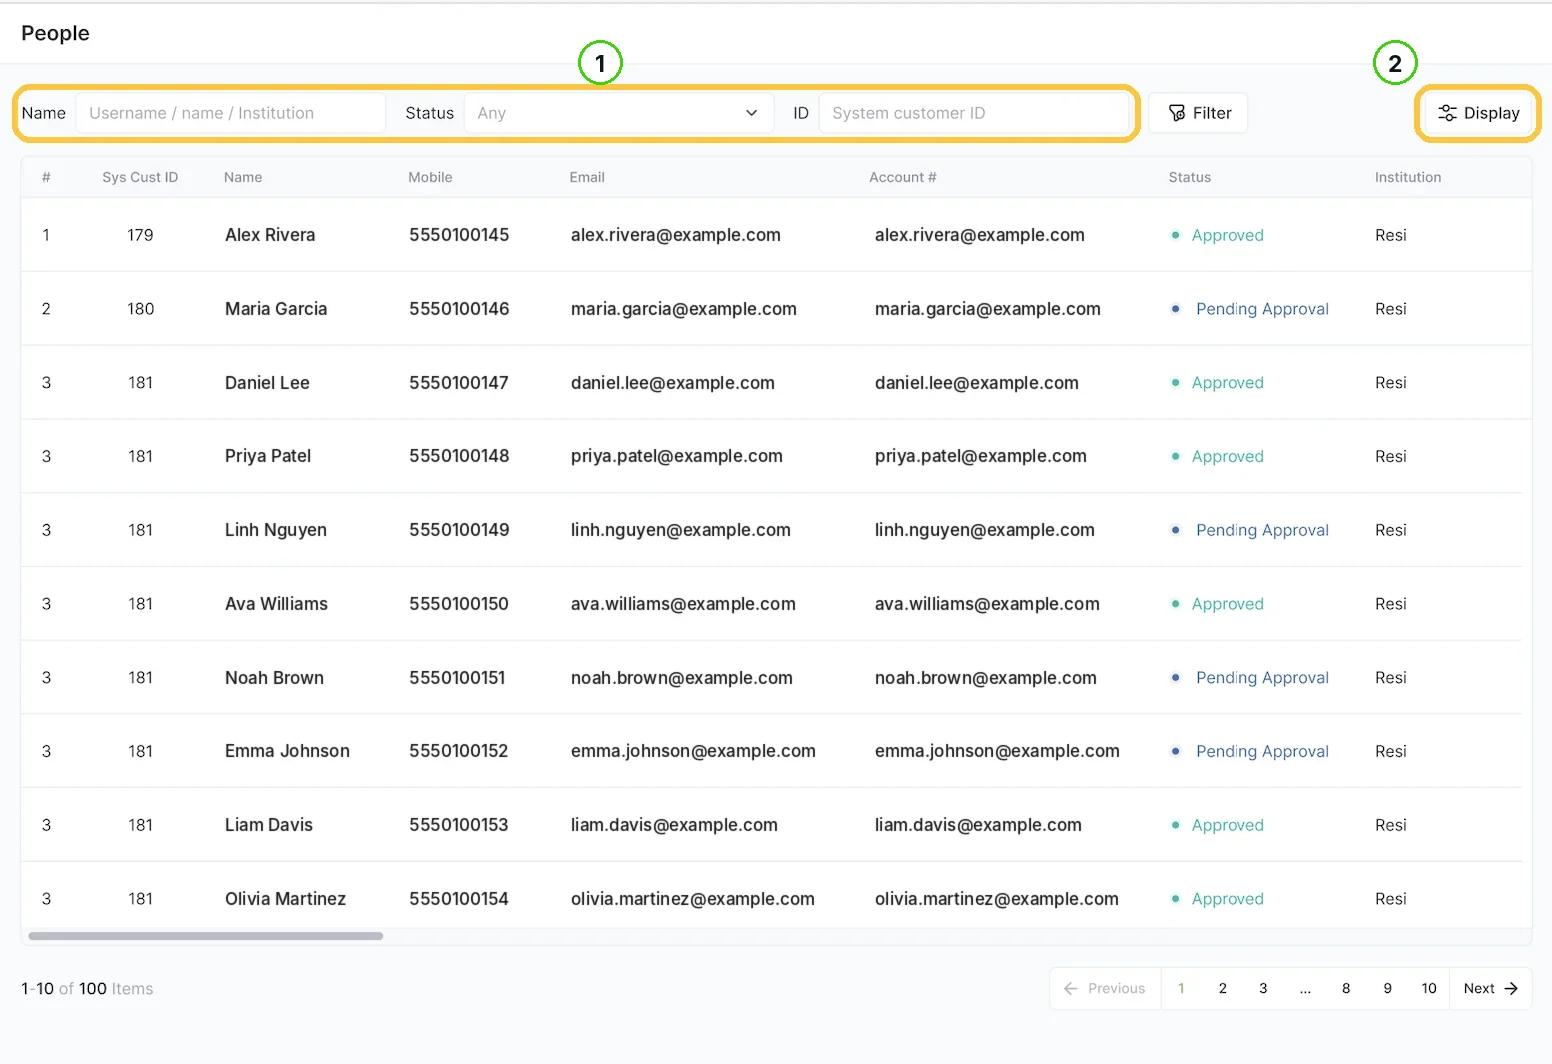
1. Name, Status and ID
Filter your team by Name, Status or ID. See Managing Your Inspector List.
2. Display
Opens Column Configuration: tick the columns you need, such as Work States, Work Lenders, Uploaded Count and Insp In Progress.
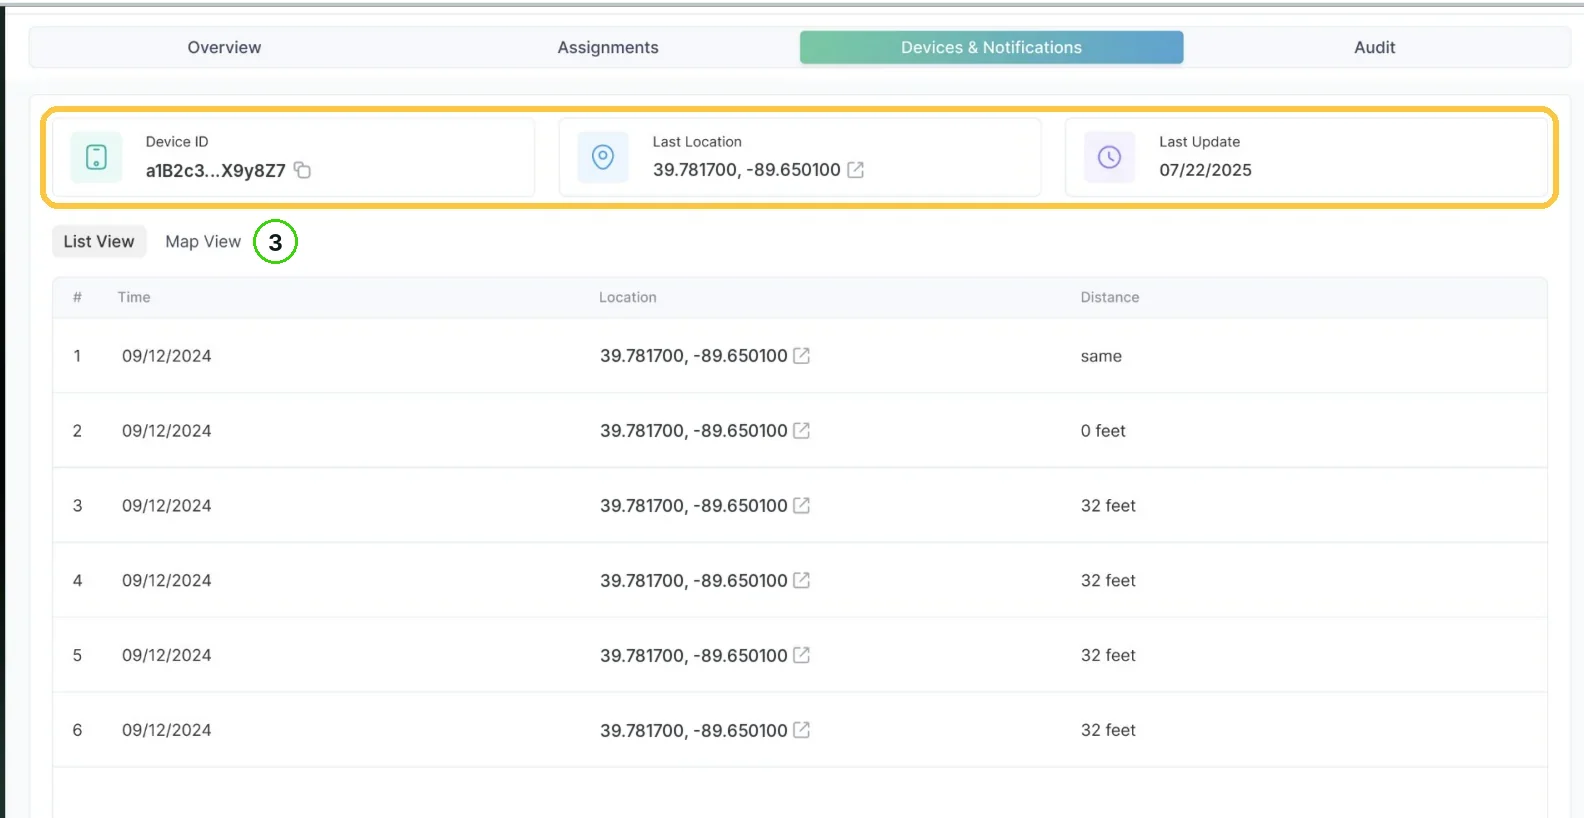
3. Assignments, Devices & Notifications and Audit
The tabs beside Overview on an inspector's profile, for checking their work. See Auditing an Inspector's Work.
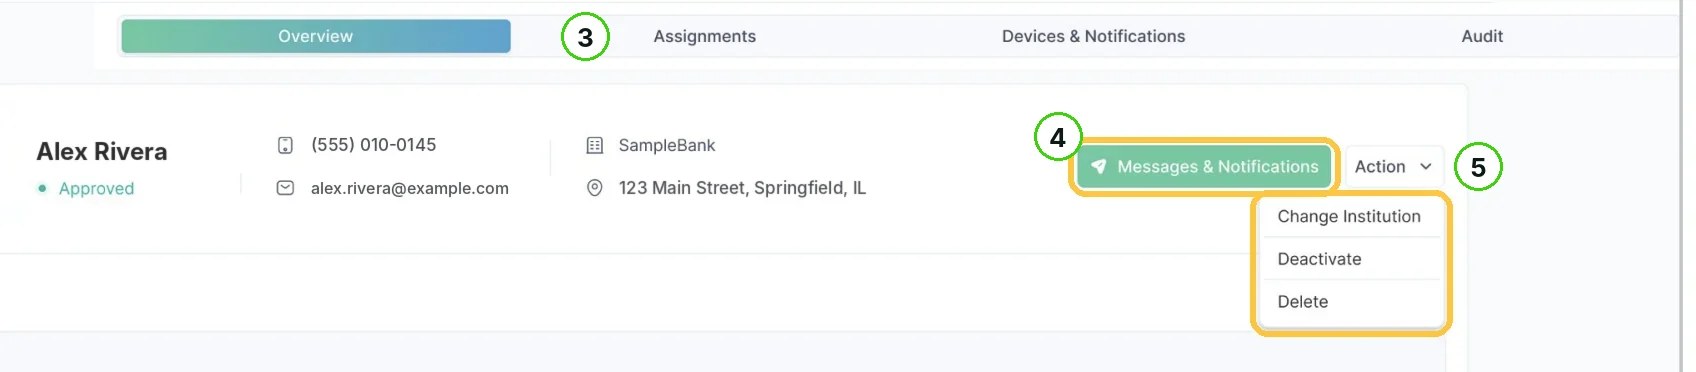
4. Messages & Notifications
Opens Send Message: a Title, a Body, an optional Topic and Advanced Data. The message goes to the inspector's registered device. See Setting Up an Inspector Profile.
5. Action
Holds Change Institution, Deactivate and Delete. Use Deactivate to suspend access and keep the inspector's history; Delete removes the account for good.
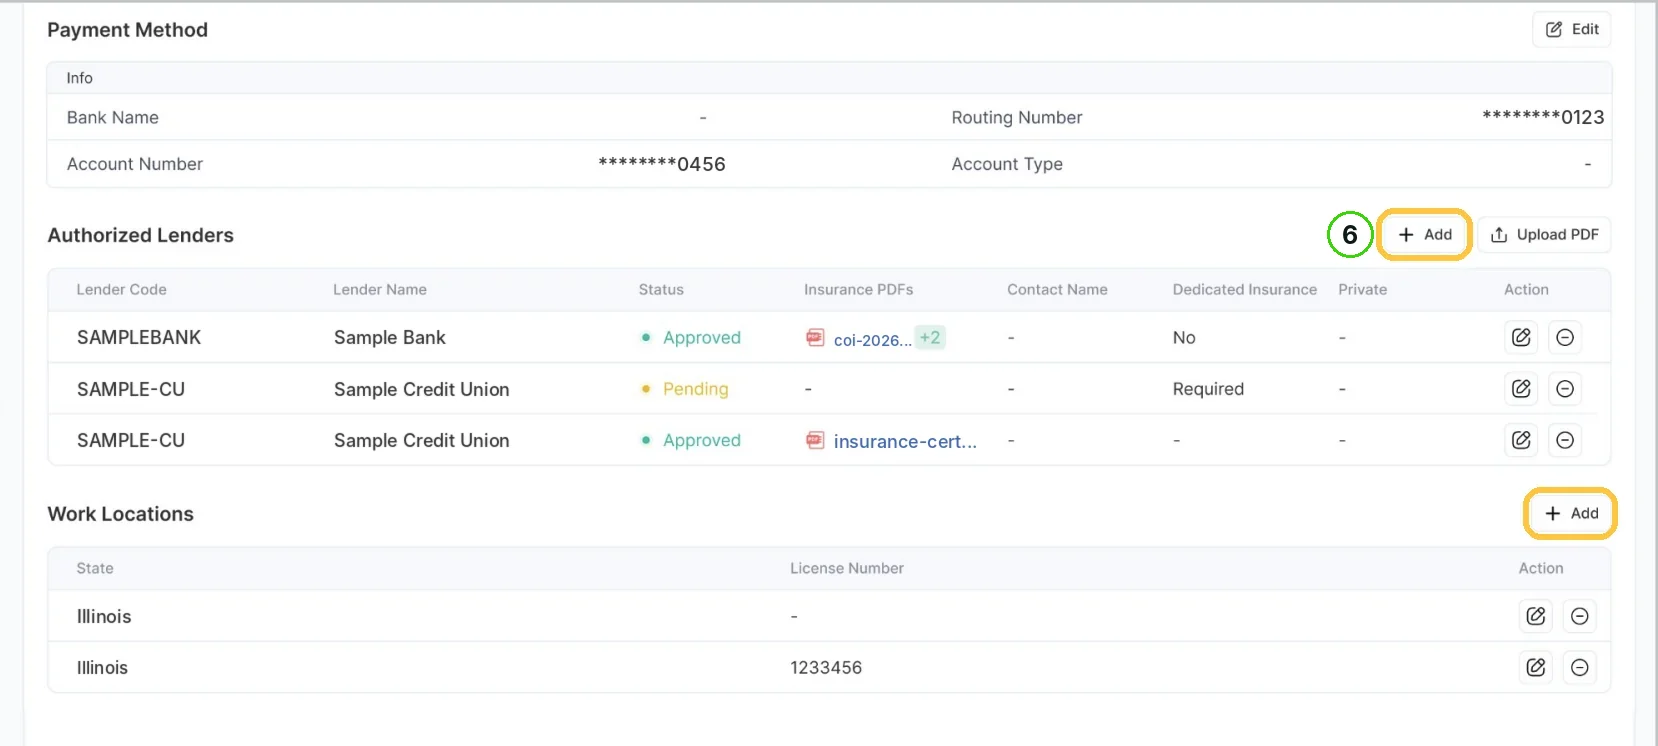
6. + Add
Adds a row to Authorized Lenders, the lender accounts the inspector can work on. Work Locations has its own + Add for the states the inspector is licensed in. See Setting Up an Inspector Profile.
Keep both sections current: together they decide which jobs the inspector can see and accept.
Step 8 — Auditing an Inspector's Work
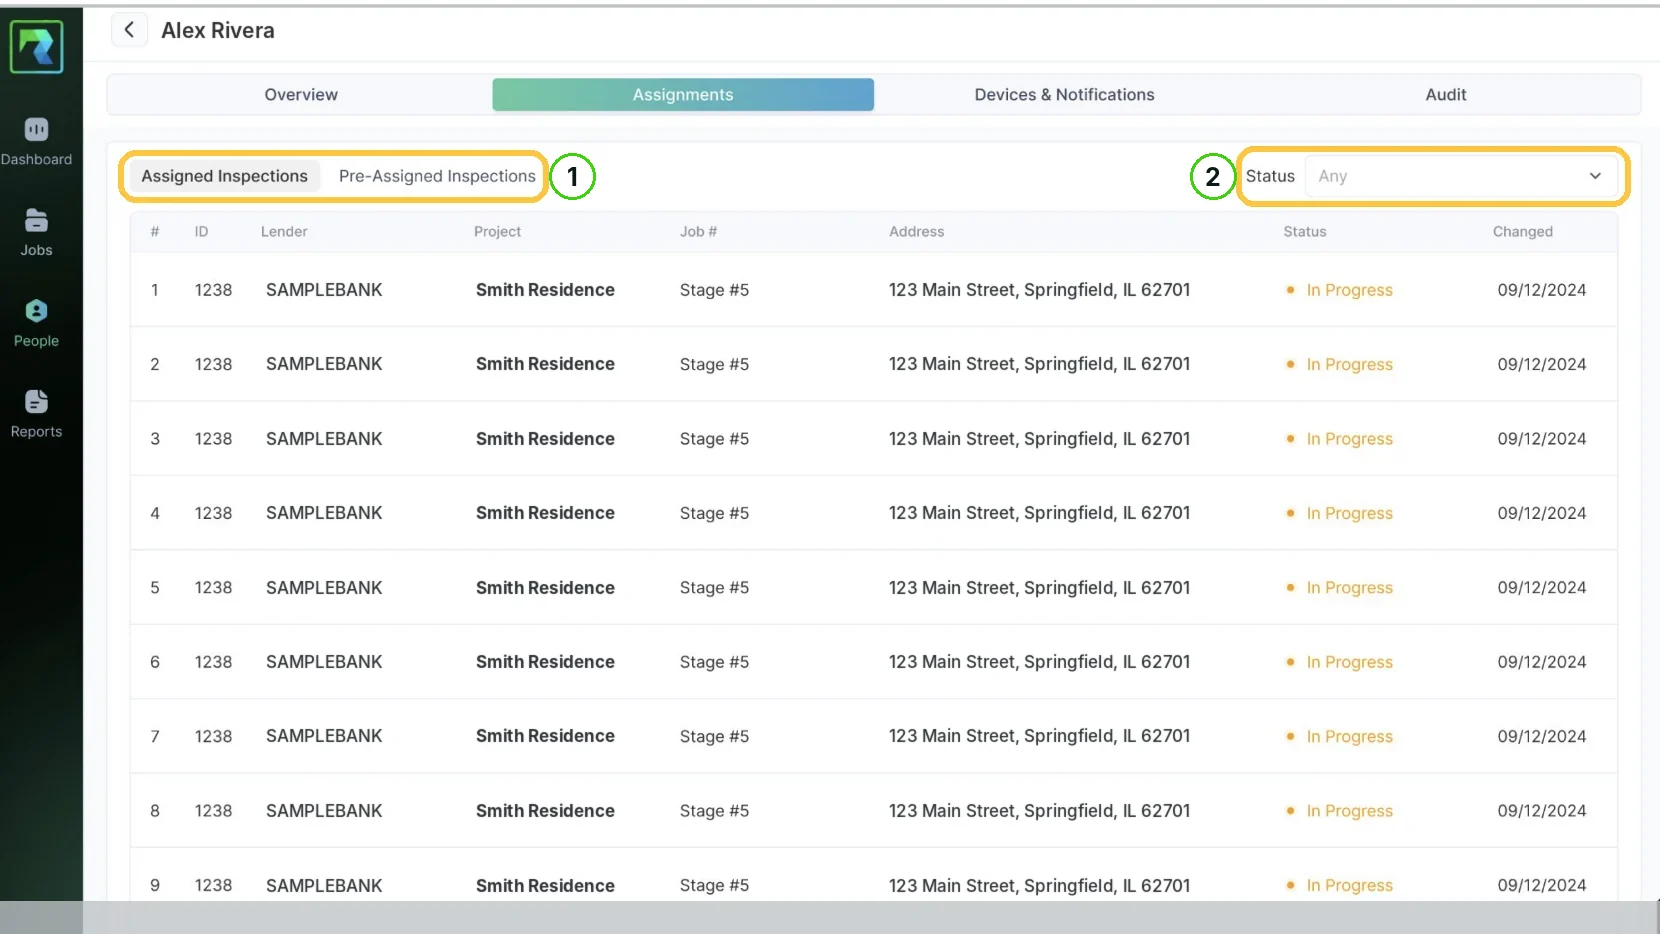
1. Pre-Assigned
The Assigned and Pre-Assigned toggle at the top of Assignments. Assignments lists every job tied to the inspector, assigned or pre-assigned, each with the lender, project, job number, address, status and the date it last changed. See Auditing an Inspector's Work.
2. Status
Filter by Status to see what is still In Progress.
3. Map View
On Devices & Notifications. It shows the route as numbered pins joined by a line, useful when you need to confirm the inspector visited the property.
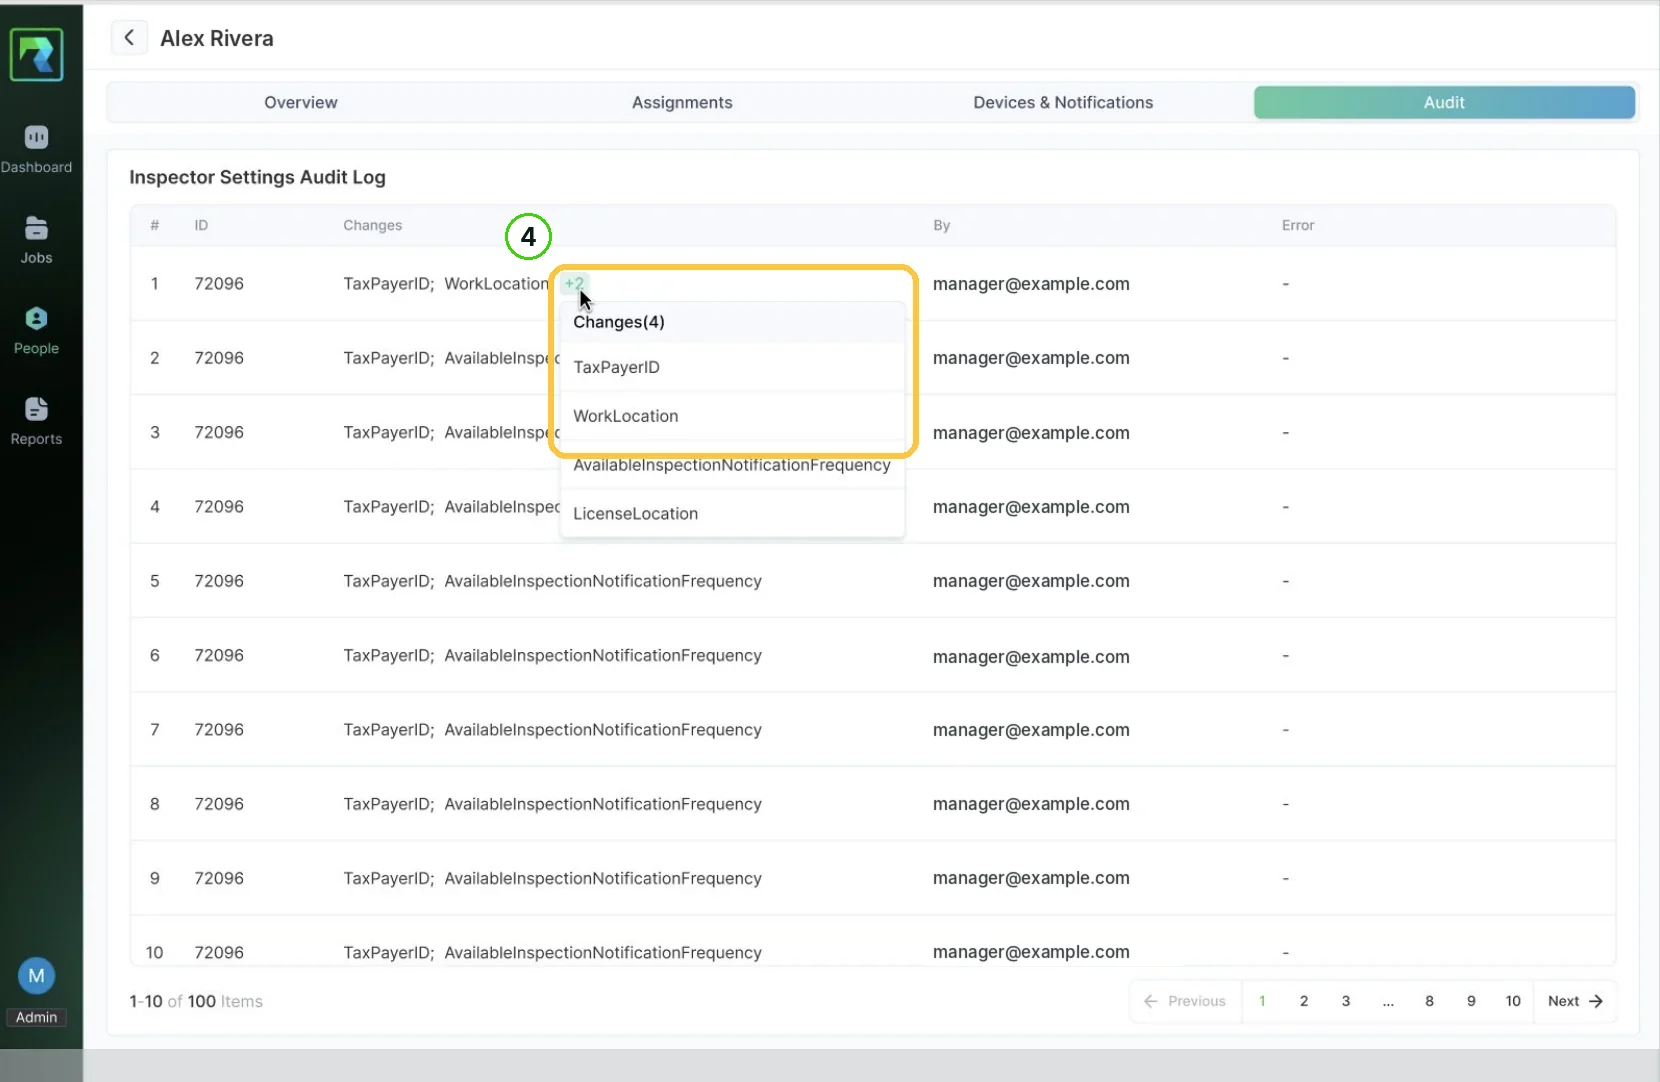
4. +N badge
In the audit log. When several fields changed at once, click it to see the full list.
Step 9 — Account Settings
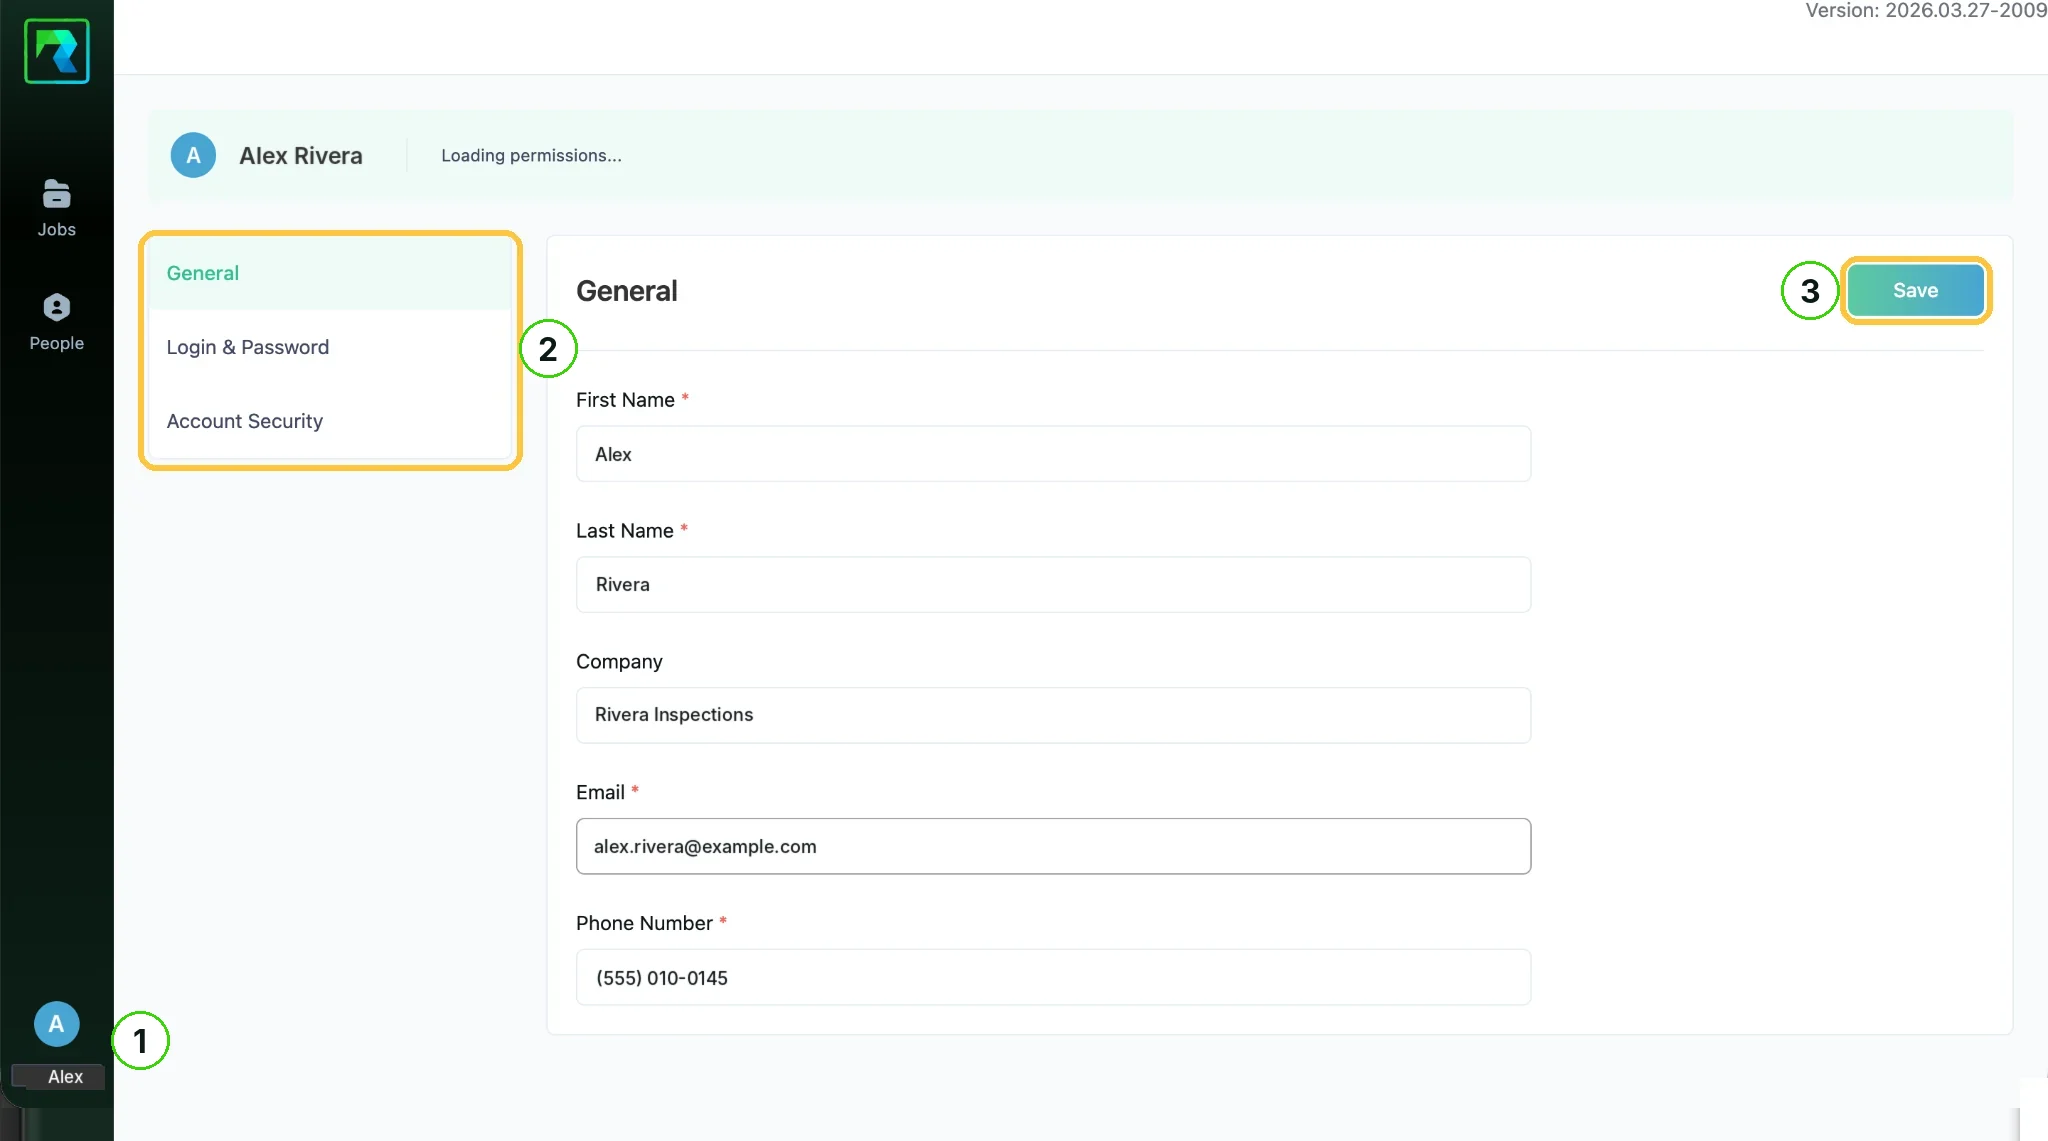
1. Your name or avatar
At the bottom of the left sidebar. It opens Account Settings on General, with your First Name, Last Name, Company, Email and Phone Number. See Updating Your Account Settings.
2. Login & Password
Sets a new password. Use a strong, unique one and change it right away if you think it may have been exposed.
3. Save
Saves the changes on General.
Account Settings doesn't control your lender access or job assignments. Your company administrator manages those in People.
Tips
DO
- •Click Save on each Questionnaire page as you go.
- •Check the Required count on every page before you click Submit Report.
- •Check Due Date before you start a job.
- •Choose In Progress to fix a rejected report.
WATCH FOR
- •Reset. It clears every active filter.
- •Delete in the Action menu. It removes the account for good.
- •A greyed-out Submit Report. Check the status badge.
- •Changing the status. It notifies everyone on the job.
Troubleshooting
Vendor workflow
- Button glossary (this guide)
Use this guide with AI.
Ask RAZE AI here, or hand the plain-text guide to the assistant you already use.
Was this guide helpful?
Still stuck? Ask RAZE.
Ask RAZE AI for an instant answer from these guides, or send a request and the RAZE support team replies by email.
Ask RAZE AI.
Instant answers from these guides, any time.
Send a support request.
Tell us the product and guide; the form is here.
Call or email.